• Mossberg Owners is in the process of upgrading the software. Please bear with us while we transition to the new look and new upgraded software.

Removal of SA-20 Bolt release button assembly

BrianJ

.270 WIN
Is anyone familiar with the steps for removing and reinstalling the bolt release button and assembly. There appears to be a single roll pin but I seem to remember reading somewhere that it had to come out and go back in from the same end. Can't find the article now. What is the best way to remove it and reinstall it?
Secondly, are the parts and springs going to go off like a hand grenade?
Has anyone ever installed a larger release button like the ones made for Benelli or Beretta? They seem to give a little more leverage.
 
I'll take a look at mine when I get home (I'm at shop right now). I can't recall if the button is an alloy or not. I'm very mechanically inclined and could probably figure it out. Maybe design a fixture if necessary. Are you looking to extend it slightly? Maybe drill and tap and add a little pad or something?

What are you using for a bolt lever? Did yours come with a "spoon" or a "peg"?

In related news, WM had some Federal 20ga Target loads (blue box) so I picked up a couple boxes--about $6/25rds. Maybe go back and get a couple more boxes... These cycled perfectly the last time I shot them at the range and another trip is in the near future... :)

PS: this attractive young lady posted a VIDEO of her new SA-20. :D She's into Louis Vuitton bags if that is also your thing! :cool: ;)
 
Last edited:
OK, here is how you remove the bolt release "button" from a SA-20. The gun will need to be taken down to the receiver--ie: remove barrel, bolt, trigger group, etc.

(1) take a 3/32" drift and tap the roll pin "up" towards the ejection port. My bad that I started with a 1/8" drift and gaga-ed the opening a little so don't YOU be bad... ;) A roll-pin drift would be prudent for this--the kind with the little "nub" that centers the drift in the roll pin.
(2) As you tap through, the drift will help hold the spring-loaded bolt release assembly in position.
(3) once the roll pin has been tapped through enough, you will be able to remove the drift and then the bolt release assembly.
(continued below)
 

Attachments

  • br1.jpg
    br1.jpg
    700.1 KB · Views: 28
  • br2.jpg
    br2.jpg
    656.2 KB · Views: 26
  • br3.jpg
    br3.jpg
    260.7 KB · Views: 27
(continued...)
(4) the bolt release assembly is shown. It is all magnetic so I would assume steel/cast iron. The button portion is articulated and pivots on the silver pin shown. There is about a 1/8" O.D. spring inside the hollow button. Maybe drill and tap with a screw that will hold an extension on. Any screw should not go through the button enough to interfere with the spring inside.
(5) the roll pin will need to be driven all the way through into the ejection port. My drift bottomed out (wasn't long enough) so I used a 3/32" drill bit to push it the rest of the way through. Note that I chamfered the end of the roll pin to ease installation.
(6) installation was fairly straightforward: tap the roll pin in from the bottom while holding the bolt release assembly in place. I had to use a socket to put pressure on the bolt release assembly to allow the pin holes to line up. The socket is a Craftsman 9/16" deep that just barely fit into the receiver. Gently tapped until the roll pin was back where it began.
 

Attachments

  • br4.jpg
    br4.jpg
    264.9 KB · Views: 31
  • br5.jpg
    br5.jpg
    448.4 KB · Views: 31
  • br6.jpg
    br6.jpg
    696.1 KB · Views: 31
Last edited:
Thanks Bobster. That is exactly what I was looking for.
I want to see if I can get/make a button that is easier to press and faster to find.
Do you think there is enough metal on the button cap to tap a screw into? Say an 8-32?
 
I should have probably taken apart the assembly but it looked simple enough. Slide the silver pivot pin out, separating the button from the other piece. The button part appears to be cast while the other part is obviously stamped. The button could probably be tapped for 8-32. Note that any extensions would have to go on AFTER the button is reinstalled...unless they are the same diameter and able to fit through the receiver hole. Your turn to post pics... ;)
 
I finally got to finish (for now) and test some of the mods I have made to the SA-20. Thanks to Bobster for advice on the bolt release button.
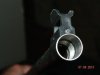
The first thing I added was the choke. On the 20 inch cylinder bore it made a big difference, especially shooting trap. The Trulock chokes (extended IC and IM) also seem to make it handle steel targets better including the dreaded Texas stars. I did not try the choke thread myself. Mike Orlen did the work and a perfect job too. Apparently the chrome lined barrel made it impossible for most of the people I called.
The rest of the work I did myself...mostly.
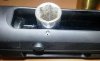
The mag extension is from Choate. Filing out the crimp in the mag tube went pretty smooth. Just be careful to tape the end of the file, keep the end of the tube square with the axis of the tube and don't remove too much metal.

The bolt release extension makes a tremendous difference. It is actually made for a Benelli by Taran Tactical. They even provide the hardware and some much needed advise. It makes releasing the bolt a light tap instead of having to squeeze that small button. This was kind of tricky as there is not much metal on the button to thread. They provide a 5-40 flat head screw but I changed it out for a 6-40 (not 6-32) to get a little more thread in the metal. I am not sure how well the tapping will hold up after some time. I do have a backup plan that involves a little welding before threading.

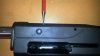
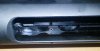
Lastly I opened up the loading port a little. I say a little because I have seen some guns completely hogged out to where the follower is visible from the side. I'm not going there. The problem I was having was that during fast weak hand reloads, (fast for me anyway) the shells would hit the flat spot on the receiver, just below the mag tube opening, and stop dead. sometimes it would go in, other times (most times) I fumbled it. I used a file for most of it, with the end of the file padded with electrical tape to prevent scratching the tube. It is much smoother now and noticeably faster. I could probably open it more but I'll run it for a while then see.

The velcro side saddle works well for port loading after bolt lock back, otherwise I use belt caddies (also from Choate) to load the magazine. I put a strip of adhesive velcro (the fuzzy side out) inside the caddy to keep the 20 ga shells in a little tighter. I could not find anyone to make 20 ga shell caddies.

A word of warning, most of these changes will void the warranty. My gun was working flawlessly before (and after) I made any changes.

Wish I could get a larger charging handle like the JM pro. I am looking for suggestions.

I have included some amature pics. DSCN3635.jpg DSCN3634.jpg DSCN3491.jpg DSCN3633.jpg DSCN3626.jpg DSCN3475.jpg DSCN3472.jpg DSCN3460.jpg
 

Attachments

  • DSCN3499.jpg
    DSCN3499.jpg
    37.9 KB · Views: 18
Sorry about the size of the pics. I thought I selected all thumbnails.
Mods if you can fix it, go right ahead.
 
Nice write-up and photo documentation, Brian! :)

How much did the ext. bolt release cost? And what makes it different than a piece of flat metal with a hole?

I may do a little relieving as you did--might help with the "fat thumb" dilemma I have... ;)

As you know, the bolt handle is a fairly important piece. And with the dearth of replacement parts for the SA-20, I would be careful with any replacement I used. I think mine is cast, but probably hardened. And I have the "spoon" style. :( How is yours holding out? And discernible wear?

It almost looks as if you could tap the inside of your bolt handle "cone" (accurately) and put some kind of lightweight Al "cup" over the existing knob held onto the tapped hole. But I don't have that style to compare and I wouldn't do any butchery unless I had a replacement. It doesn't look like an overly complicated piece to machine but I would imagine the initial prototype would be the most costly. And there are extra weight considerations of a bigger bolt knob that need to be looked at. I'd guesstimate to have one measured and machined would be in the $60-$100 range for a one-off. Then maybe $30-$40 for additional units depending on quantity...

PS: and for obvious reasons, anything attached to the knob needs to be securely attached so it doesn't fly off and wack you in the face... :eek:
 
Thanks

To answer, $25, a little too expensive but I wanted to try it out. If not for me shooting matches, I would have left it alone. I think they could easily sell for $10-$15. Mossberg should remake the button to work like this. Very light touch and smooth. I can actually load the port over the top from the side saddle and just slap the button in one move. It would look pretty cool if I wasn't so old and slow.

The difference, $25, countersunk screw hole and a nice finish. I have a few of the 6-40 screws if you need a couple. They are cheap on line though. ASMC Industrial.

I just took metal out slowly with a rat tail and kept checking for even removal and no flat spots. Not so easy. I think I got a little more on one side than the other. When finished filing, I followed up with 400 - 600 then 1500 with a little CLP. Also kept everything taped off and made sure I didn't remove the little lip in the bottom of the tube that stops the follower. Very tiny, might not make a difference as it goes all the way around too.
If I still have some loading problems, I might try removing a little more in the winter. It seems to work much better now with just the flat spot gone.

Supposedly the bolt handles are mostly forged from some kind of Moly steel like 4140 but I only read it somewhere. No real wear on mine but the cone is pretty deep. Same feeling though, I don't mess with a part until I know I can get another.

I called a custom bolt handle guy, don't remember who, he said more like $200 for the first. $60 I might go for. A local guy might do it cheaper.
I might try the guy who threaded my barrel.

Let me know if you come up with any more good ideas.
 
Back
Top