You are using an out of date browser. It may not display this or other websites correctly.
You should upgrade or use an alternative browser.
You should upgrade or use an alternative browser.
FINALLY FINISHED: Crafting wood furniture for a Mossberg 590 Shockwave
- Thread starter Dr. Marneaus
- Start date
Dr. Marneaus
.270 WIN
Here's how mine is coming alone.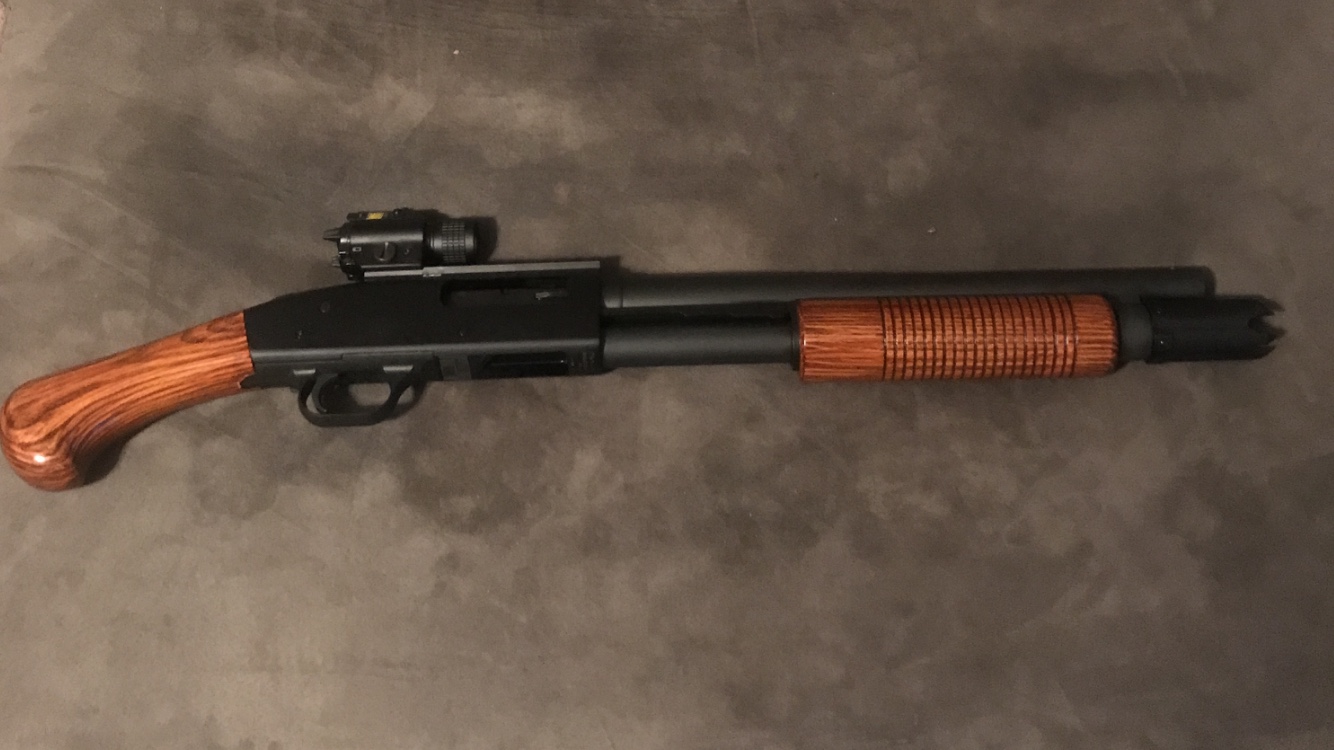
Sent from my iPhone using Tapatalk
Nice! Is that the eBay furniture?
Dr. Marneaus
.270 WIN
Looks like the eBay set to meWelcome JoeBuck. Your Shockwave looks great. Explain the breacher on the ammo tube.
Did you cut your rear grip from a full stock?
Yes it isNice! Is that the eBay furniture?
Sent from my iPhone using Tapatalk
Dr. Marneaus
.270 WIN
Yeah....As we say in the South....It's a Love, Hate, Thang.
What kind of wood is that? It looks more like fresh cow hide.
I dunno it's whatever wood mossberg makes their wood stuff out of if you catch my drift.
Dr. Marneaus
.270 WIN
Yes it is
Sent from my iPhone using Tapatalk
Cool that's the first set I've seen on here. That looks great!
I dunno it's whatever wood mossberg makes their wood stuff out of if you catch my drift.
Mossberg uses either Birch or Walnut trees. From the looks of your picture, I think you're carving a Birch tree into a raptor grip.
Birch trees are pretty common these days. It's inexpensive, pretty strong, and fairly resistant to cracking in freezing temps.
Sent from my iPhone using Tapatalk
Last edited:
Dr. Marneaus
.270 WIN
I haven't had much luck staining birch, how
I haven't had too much luck staining birch in the past so I will see what happens when I am done whittling this stick
Mossberg uses either Birch or Walnut trees. From the looks of your picture, I think you're carving a Birch tree into a raptor grip.
Birch trees are pretty common these days. It's inexpensive, pretty strong, and fairly resistant to cracking in freezing temps.
Sent from my iPhone using Tapatalk
I haven't had too much luck staining birch in the past so I will see what happens when I am done whittling this stick

With that receiver rail in place, he can't use the front bead anyway. If he tried, he'd be shooting well above what he was aiming at.
I'm not sure why anyone hasn't just marked where a hole needs to be drilled to accommodate the front sight yet. It would be really simple to do.
Place a drop of paint on top of your front sight, then put the shield in place, which would leave a paint mark on the inside surface of the shield so you know exactly where to center punch and drill a hole larger than the front bead for clearance. That would also help to keep the shield from walking under recoil because the bead would be through it too.
Or even judicious measuring would be more than adequate without the mess would be even better.
With as many as are putting heatshields on their gun, I've been waiting for someone to measure and drill it. But I've not noticed anyone do it yet.
Dr. Marneaus
.270 WIN
With that receiver rail in place, he can't use the front bead anyway. If he tried, he'd be shooting well above what he was aiming at.
I'm not sure why anyone hasn't just marked where a hole needs to be drilled to accommodate the front sight yet. It would be really simple to do.
Place a drop of paint on top of your front sight, then put the shield in place, which would leave a paint mark on the inside surface of the shield so you know exactly where to center punch and drill a hole larger than the front bead for clearance. That would also help to keep the shield from walking under recoil because the bead would be through it too.
Or even judicious measuring would be more than adequate without the mess would be even better.
With as many as are putting heatshields on their gun, I've been waiting for someone to measure and drill it. But I've not noticed anyone do it yet.
I'm not planning to use the original sight hole, but I am planning to drill and tap a New hole in my heat shield. I think my drill bit arrived yesterday
Dr. Marneaus
.270 WIN
Okay making some progress. I'm having a hell of a time with the stain matching. In some rooms of my house the forend looks more redish or orange in other rooms it looks more gray brown. It's driving me nuts.
I played around with vinyl wrap today for a few hours and got a meh result. Such a pain to try and wrap the end of the grip.
I also finish sanded and stained the wood grip I'm making. Something is just off about it though, and I can't tell what ...and I'm having the aforementioned stain issues.
I played around with vinyl wrap today for a few hours and got a meh result. Such a pain to try and wrap the end of the grip.
I also finish sanded and stained the wood grip I'm making. Something is just off about it though, and I can't tell what ...and I'm having the aforementioned stain issues.
Dr. Marneaus
.270 WIN
Oh and also I need to figure out what's up with my bolt and ejector and everything.
I'm getting a stuck bolt sometimes (dry cycling). If you are good and vigorous every time you rack it it's fine but sometimes when you try to go slow it hangs up solid. I've noticed this doesn't happen with the action release button but really only when you drop the hammer. For some reason it seems like the action is struggling to overcome the hammer or start the hammer in the rearward motion, and maybe this is combined with the ejector? The 'old' style ejector is a bit better but still definitely makes the bolt hang sometimes. I guess I can try changing parts back and around etc to see what all does and doesn't cause it to stick.
I can just remove the ejector to test that. I can replace the engraved bolt with the original, etc.
It's definitely not the bolt lock, as that drops nicely as soon as you move the slide back about half of an inch, and it stays down and out of the way. It looks like the bolt slide is nicely grabbing the rear hook on the bolt lock as well. It seems to hang as soon as the bolt slide contacts the hammer and begins to push it back, then it locks up I think at the point where the bolt and the hammer both try to move backwards. This is where the bolt slide and the bolt are attempting to overcome the hammer as well as get past the ejector.
Any thoughts?
Dr. Marneaus
.270 WIN
Question:
is it necessary for me to install some kind of filler screw in the hole where the old bead was on my barrel?
is it necessary for me to install some kind of filler screw in the hole where the old bead was on my barrel?
Question:
is it necessary for me to install some kind of filler screw in the hole where the old bead was on my barrel?
Shouldn't be necessary, other than for cosmetic reasons. You've got yourself a barrel with a single exhaust port:
http://www.magnaport.com/sgun.html