You are using an out of date browser. It may not display this or other websites correctly.
You should upgrade or use an alternative browser.
You should upgrade or use an alternative browser.
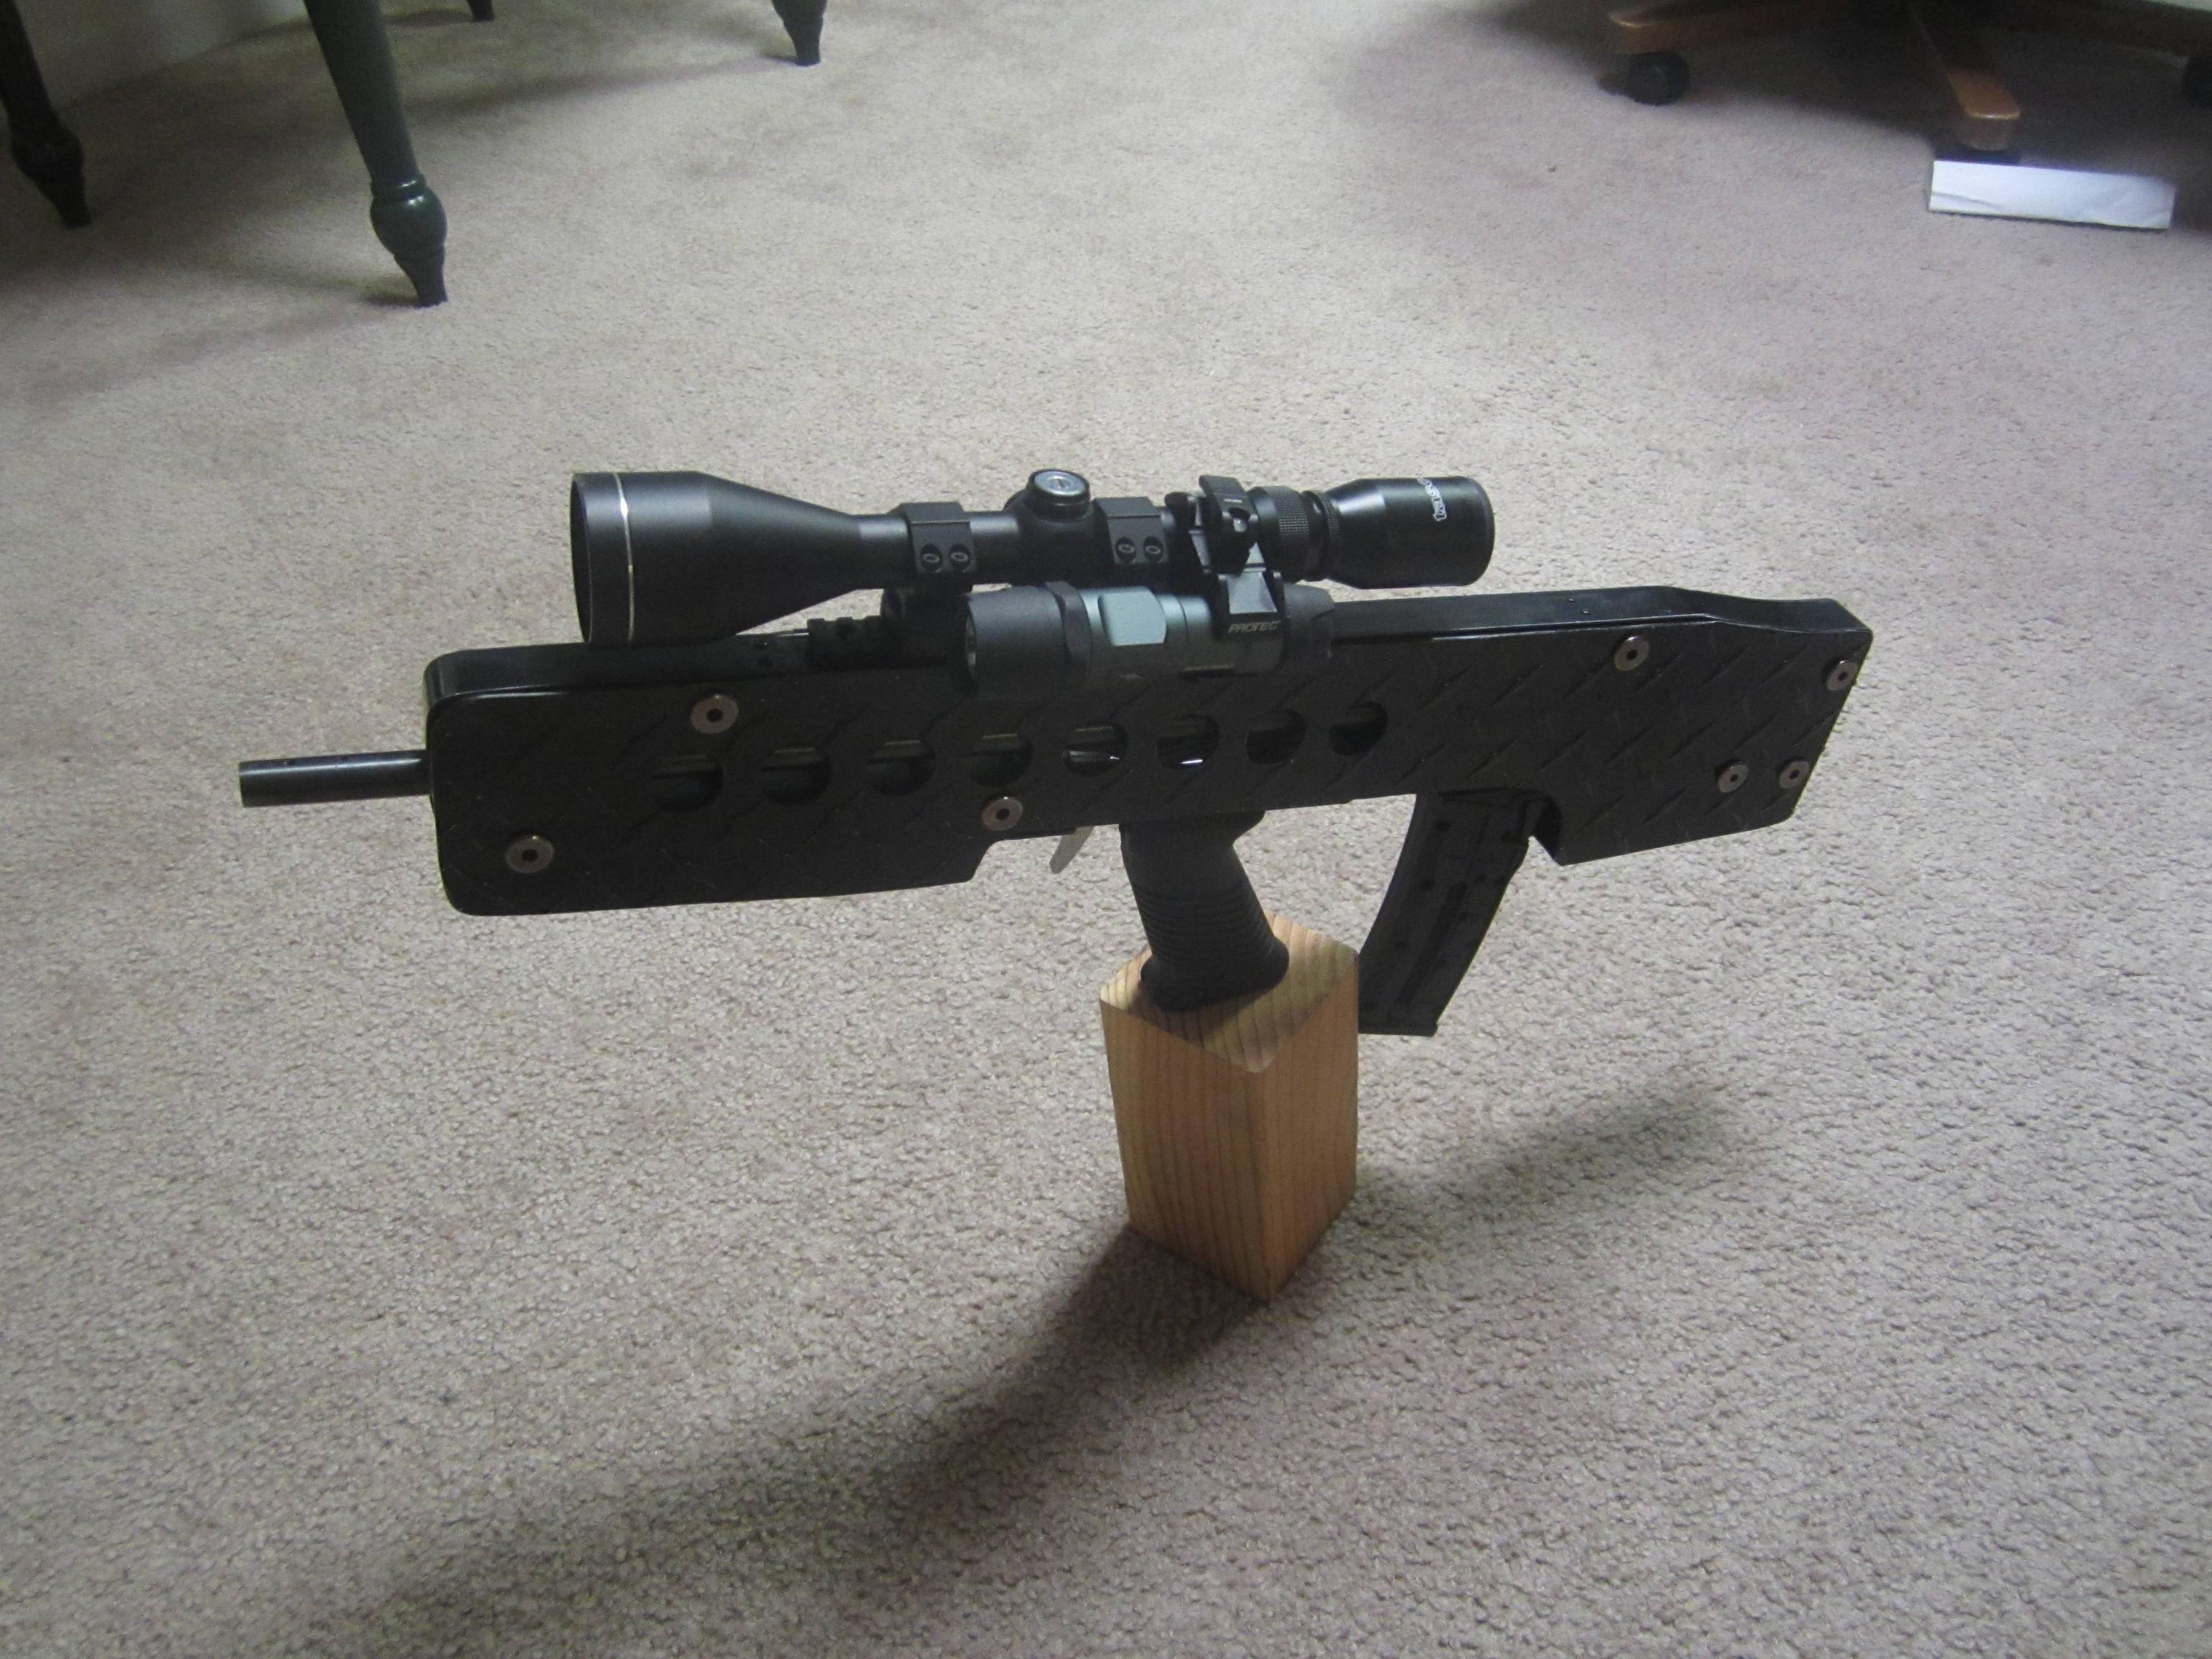
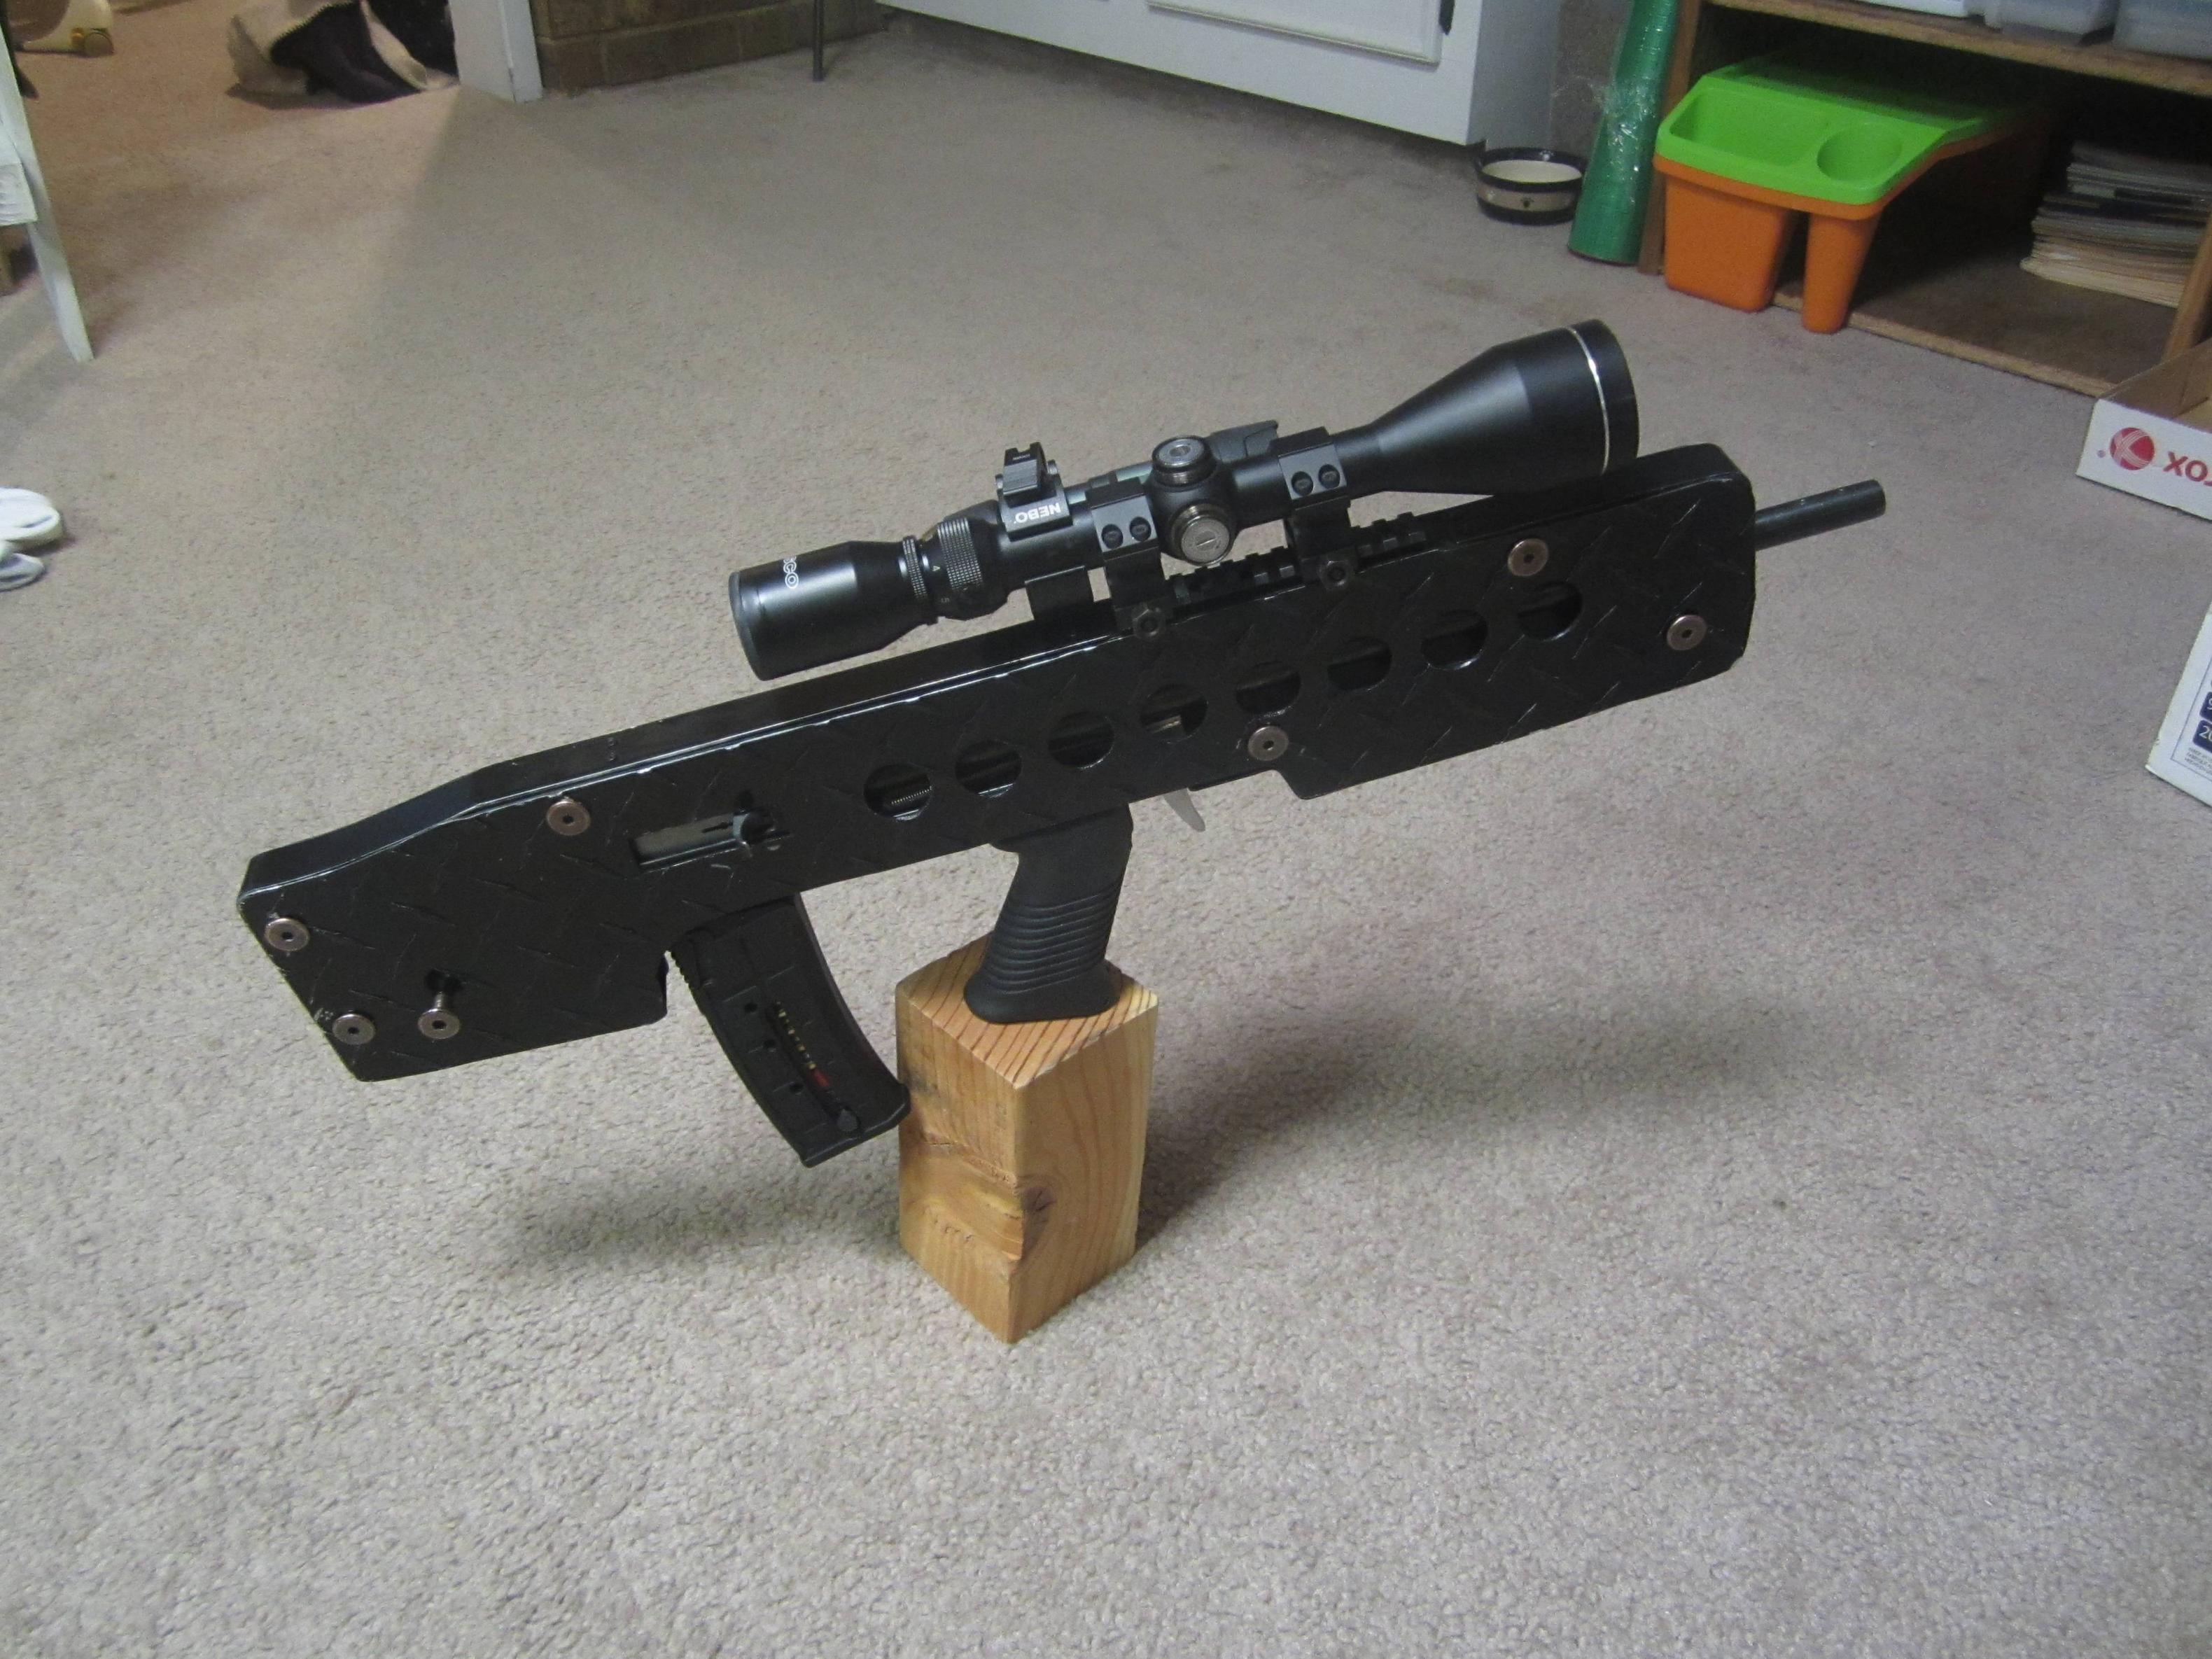
My own little plinkster...
- Thread starter makenzie71
- Start date
OK, now THAT is freakin sweet!!!
Nicely done Sir...
Nicely done Sir...
makenzie71
.410
Thank you. For my budgeting limits and the 8 or so hours I was willing to dedicate to doing it, I think it turned out acceptably. Now, though, it weighs 7lbs 12oz and, since I like the way it came out so much, I'm trying to think of a way to make it again, only lighter.
I'll definitely be following your progress. It'll be great to see what you come up with...
makenzie71
.410
I took it out to do some shooting the other day.
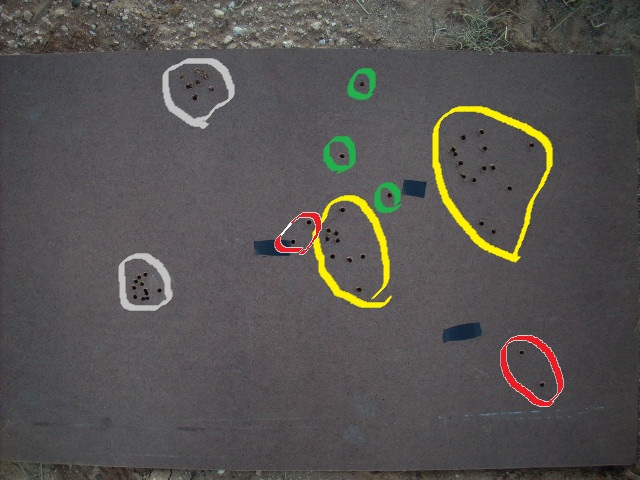
These were shot at 60 yards. The yellow groups are standing, plinking away. I got three flyers (green) out of these shots but none out of the later groups. I jerked or something to get those. The two red groups were two shots each to adjust my scope. The grey were the final shots fired while braced against my open car door. It was a bit windy and it's a car door...not super stable, but still grouped pretty well. I'm pretty happy with it so far.
I had a lot of trouble with my trigger, though. I had to keep tuining it and it worked "okay", but it had a number of issues...so last night I made a new trigger and rocker assembly.
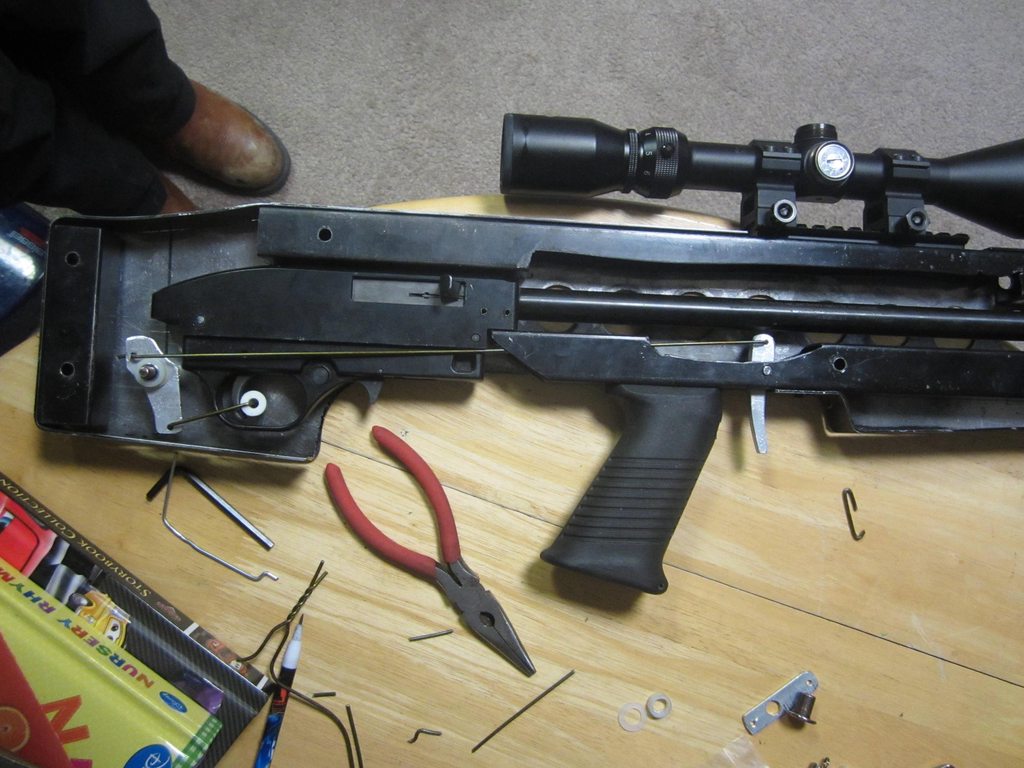
I wasn't happy with the first trigger. There was too much travel, it was sloppy, and the link that pulled the primary trigger had a tendency to "slip off" and disable the gun. The rocker also had a tendency to "flex" under load. I thought I had fixed that problem with a thicker aluminum piece, but no dice.
The first task was the secondary trigger (or primary, depending on perspective...the one you pull with your finger). The lever side above the pivot wasn't as long as room could allow, and the hole for the link was too big. Originally I was going to use a 3/16" link, but that was too big to clear the gun in other places. So I had to go with a 1/16" drill bar to handle it. Changing put extra slack in the assembly.
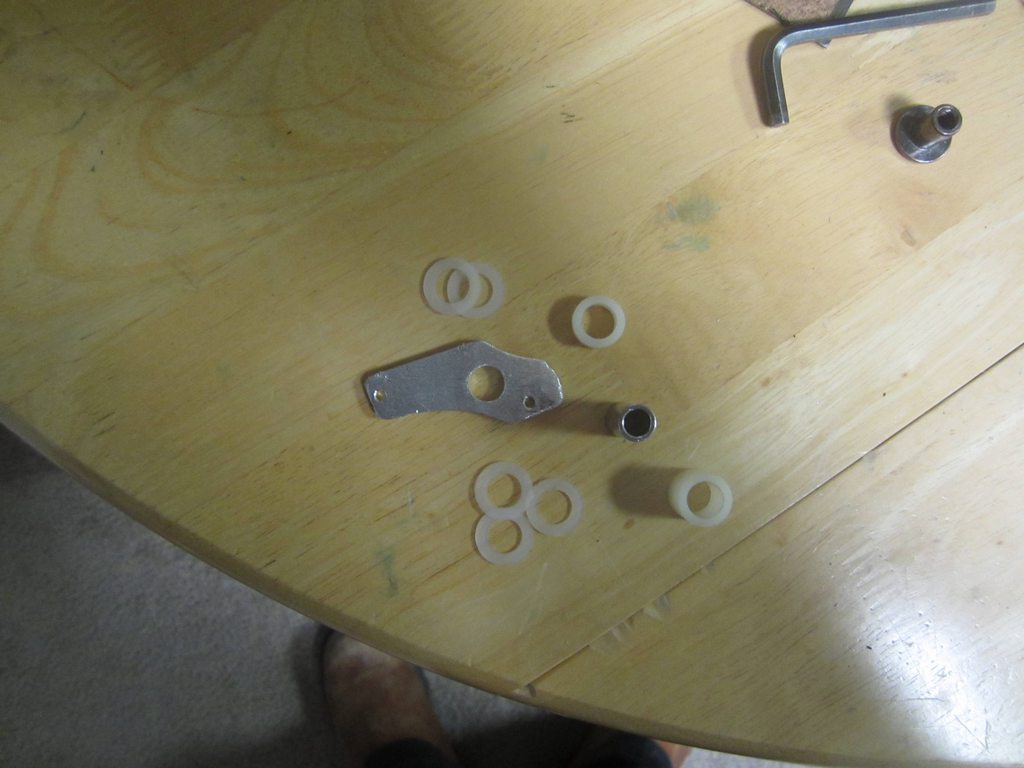
The new trigger is carved from 1/4" aluminum plate. The biggest change was that I was able to get the link point nearly 1/4" higher. When you keep in mind that this is all about leverage, the added length becomes more significant. I Also made some changes to the bushing s holding it all in place but they were fairly minor.
Next thing was the rocker. This one is now carved from 1/8" aluminum plate, and I've made it a lot wider than the previous versions. It is way more rigid than before. The biggest things done here, though, are the hole pattern layout and better bushings. Before I was using nylon bushings cut down to fit a homemade spacer. The fit wasn't fantastic and, if I tightened the shaft down, it would put pressure on the bushings and lock my trigger...but if I left it loose it would let my rocker wobble, adding more slop to the assembly.
Now I'm using a problem 3/8" spacer to span the width of the gun. The rocker is nearly an inch wide now, and is held stable on the spacer via fatter nylon bushings and washers. Using the bushings and washers together I was able to get the rocker stable, at the right height, and it doesn't seize the trigger no matter how much I tighten the shaft.
The holes for the links were also offset. I'm not very good at geometry so it took a few cardboard attempts to figure out exactly how I want to do this, but I'm happy with my end result. Putting them as I did allowed for enough travel of the secondary trigger link for the gun to fire and reset, while only needing marginal movement from the primary trigger link. To me it should have been a simple matter of putting the primary link as close to the axis as possible and the secondary link as far from the axis as possible, but I learned that it was more complicated than that. I'm sure someone better with math could sort it out easily enough.
The last change, really, was the links themselves. My original ones had been adjusted a time or two too many and the bents and curves added more slop to the assembly. So I made new ones. However, driving half an hour to lowes or fastenal to spend another $7 on drill rod wasn't in my cards. The links seen now are made from the finest coat hanger in my closet. The final touch was using a small bushing on secondary link to keep it from ever slipping off and behind the trigger.
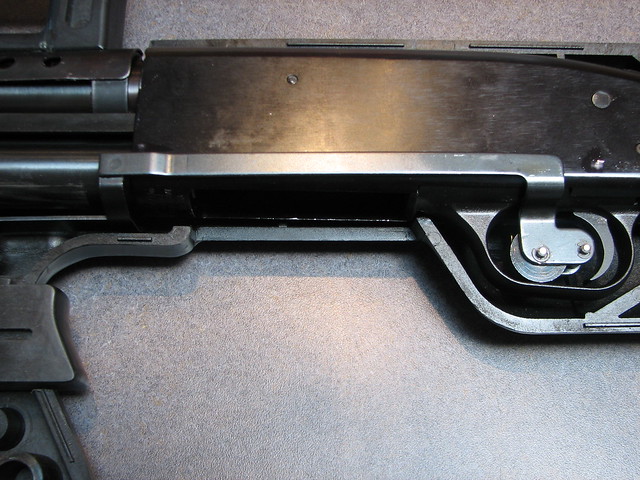
The end result:
Trigger set...
Trigger released...
Very little travel now. Pull weight has increased to about ten pounds, but it's quite tolerable. The whole assembly is still dry, though. I'm going to test it out and make sure it's working and resetting before coating the whole thing in lube. After its got some grease on it the weight should come down a tad.
These were shot at 60 yards. The yellow groups are standing, plinking away. I got three flyers (green) out of these shots but none out of the later groups. I jerked or something to get those. The two red groups were two shots each to adjust my scope. The grey were the final shots fired while braced against my open car door. It was a bit windy and it's a car door...not super stable, but still grouped pretty well. I'm pretty happy with it so far.
I had a lot of trouble with my trigger, though. I had to keep tuining it and it worked "okay", but it had a number of issues...so last night I made a new trigger and rocker assembly.
I wasn't happy with the first trigger. There was too much travel, it was sloppy, and the link that pulled the primary trigger had a tendency to "slip off" and disable the gun. The rocker also had a tendency to "flex" under load. I thought I had fixed that problem with a thicker aluminum piece, but no dice.
The first task was the secondary trigger (or primary, depending on perspective...the one you pull with your finger). The lever side above the pivot wasn't as long as room could allow, and the hole for the link was too big. Originally I was going to use a 3/16" link, but that was too big to clear the gun in other places. So I had to go with a 1/16" drill bar to handle it. Changing put extra slack in the assembly.
The new trigger is carved from 1/4" aluminum plate. The biggest change was that I was able to get the link point nearly 1/4" higher. When you keep in mind that this is all about leverage, the added length becomes more significant. I Also made some changes to the bushing s holding it all in place but they were fairly minor.
Next thing was the rocker. This one is now carved from 1/8" aluminum plate, and I've made it a lot wider than the previous versions. It is way more rigid than before. The biggest things done here, though, are the hole pattern layout and better bushings. Before I was using nylon bushings cut down to fit a homemade spacer. The fit wasn't fantastic and, if I tightened the shaft down, it would put pressure on the bushings and lock my trigger...but if I left it loose it would let my rocker wobble, adding more slop to the assembly.
Now I'm using a problem 3/8" spacer to span the width of the gun. The rocker is nearly an inch wide now, and is held stable on the spacer via fatter nylon bushings and washers. Using the bushings and washers together I was able to get the rocker stable, at the right height, and it doesn't seize the trigger no matter how much I tighten the shaft.
The holes for the links were also offset. I'm not very good at geometry so it took a few cardboard attempts to figure out exactly how I want to do this, but I'm happy with my end result. Putting them as I did allowed for enough travel of the secondary trigger link for the gun to fire and reset, while only needing marginal movement from the primary trigger link. To me it should have been a simple matter of putting the primary link as close to the axis as possible and the secondary link as far from the axis as possible, but I learned that it was more complicated than that. I'm sure someone better with math could sort it out easily enough.
The last change, really, was the links themselves. My original ones had been adjusted a time or two too many and the bents and curves added more slop to the assembly. So I made new ones. However, driving half an hour to lowes or fastenal to spend another $7 on drill rod wasn't in my cards. The links seen now are made from the finest coat hanger in my closet. The final touch was using a small bushing on secondary link to keep it from ever slipping off and behind the trigger.
The end result:
Trigger set...
Trigger released...
Very little travel now. Pull weight has increased to about ten pounds, but it's quite tolerable. The whole assembly is still dry, though. I'm going to test it out and make sure it's working and resetting before coating the whole thing in lube. After its got some grease on it the weight should come down a tad.
mingaa
Raconteur
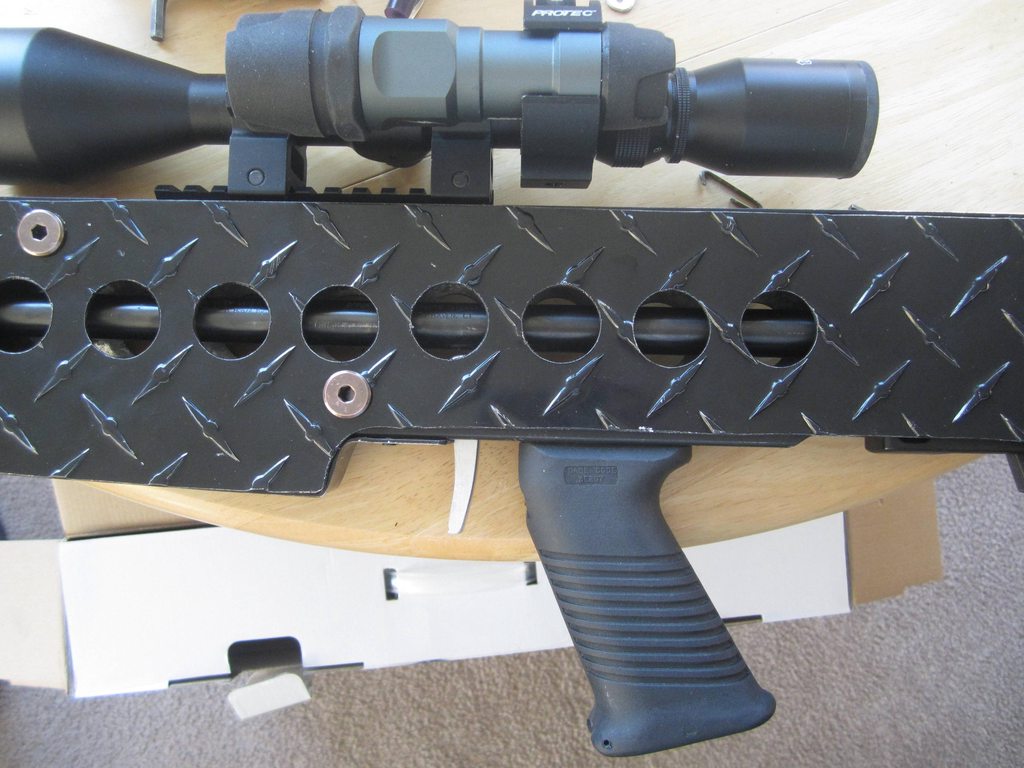
Ummm - wow! I would not have guessed that it had 702 roots until I saw it opened up! I'm not fond of the name Plinkster anyway (refer to mine as the 702) - this one needs a name. How about 22 Pit Pup?! Or Raven LRC (hey it's black and long rifle compact?!). 
Mossberg Black Diamond...
Mossberg Black Diamond...
makenzie71
.410
I got a couple videos now...
http://www.youtube.com/watch?v=iOW4uLe6 ... rw&index=2
http://www.youtube.com/watch?v=Mlm3KAHN ... rw&index=1
http://www.youtube.com/watch?v=iOW4uLe6 ... rw&index=2
http://www.youtube.com/watch?v=Mlm3KAHN ... rw&index=1
Nice job!
Very neat! I think if there was a kit available for owners it would be a hot seller. I think a kit made out of polymer would be ideal though for weight. Hats off to you for your creativity. I look forward to seeing and hearing more updates.
makenzie71
.410
I plan to make the thing again from all aluminum. I might offer it for sale but might be a stretch to convince people to buy it. I would have to charge more than the muzzelite setup to be at all profitable and that price point just might not catch a lot of interest.
I've thought about polymers and carbon fiber. The problem is that the whole setup is designed to be stressed. All of the individual stock components are required to hold the stock together. In order to do decent composites that are up to the task, the price would have to be through the roof.
Somethign I am working on, though, is sorting out a way to may it divide in upper and lower shells, instead of left and right. If I can pull that off, then a lot of the internal framework could be eliminated which would make it lighter. Just not sure how it'll all work yet.
VitSports6
20g
Have you seen how a 500 Bull Pup Trigger works? It might be something to look into and copy.
I am VERY impressed, I need to read up on your work.
Thanks!
I am VERY impressed, I need to read up on your work.
Thanks!

makenzie71
.410
^thanks!
I have but the linkage won't work the same because I can't get around rhe magazine very easily to do a push rod setup
VitSports6 said:Have you seen how a 500 Bull Pup Trigger works? It might be something to look into and copy.
I am VERY impressed, I need to read up on your work.
Thanks!
I have but the linkage won't work the same because I can't get around rhe magazine very easily to do a push rod setup
VitSports6
20g
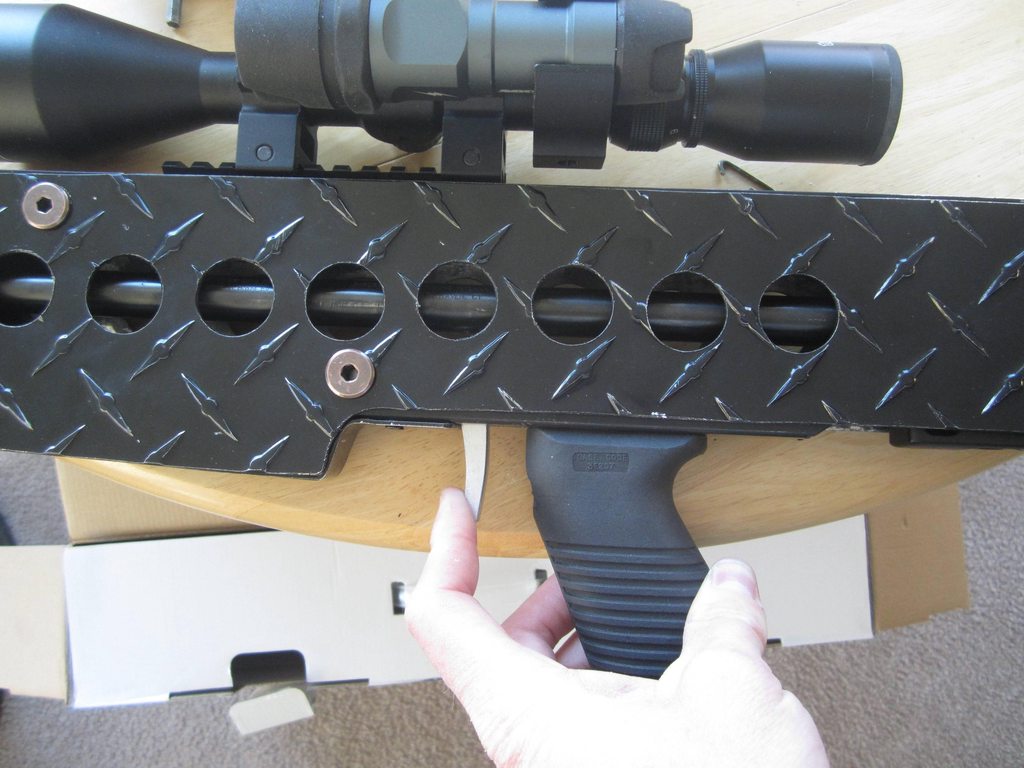
I don't think you need a push rod, I think your design is good, maybe just a little more durable, using a piece of flat stock rather than a metal rod, I think it would have less flex.
I see you have a little room for a flat piece between the receiver and the grip support, is the other side the same?
Only trying to help out, Most people complain about mushy triggers on Bull Pups.
Again, I love what you have done, just bouncing some ideas.
Have fun!
I see you have a little room for a flat piece between the receiver and the grip support, is the other side the same?
Only trying to help out, Most people complain about mushy triggers on Bull Pups.
Again, I love what you have done, just bouncing some ideas.
Have fun!
makenzie71
.410
I tried several setups like that...the issue that I was having was resistance because of how I had to bend the setup around the magazine. Most conversions use a setup like that one...a flad push rod hugging the gun. I could get it all to work, but it was stiff and I had resetting issues.
The current setup, while seemingly more complicated, is much smoother. No resistance outside of the primary trigger resistance.
The current setup, while seemingly more complicated, is much smoother. No resistance outside of the primary trigger resistance.
JoeRotella
.270 WIN
Very cool!