I participated in a day-long handgun fighting course a few weeks back. Not only did I have the opportunity to knock the rust off of a number of old, familiar tactics and methods but I was also introduced to a new technique with which I was not familiar.
It's called Position Sul and, IMO, is an excellent tactic to learn and practice for close-quarters work.
According to Max Joseph & Alan Brosnan, the alleged inventors of Position Sul, it is the one ready position that ensures team safety & handgun retention, even in CQB. The name Sul is taken from the Portuguese language. It simply means “south” since that’s where the muzzle is directed in this position.
Alan Brosnan describes the genesis of this position this way:
Here's a description of Position Sul from another website:
1. The support hand palm should be flat against the solar plexus, with fingers extended and parallel to the ground. The support hand thumb is pointed towards the shooter’s chin. (Elevation of the support hand may vary but most shooters find that they are able to maintain correct hand position without undo stress on the wrists when the hand is held about naval level.)
2. The strong hand maintains the grip on the handgun. You must also keep the trigger finger off the trigger and on the slide or frame.
3. The muzzle of the weapon is pointed directly at the ground between the shooter’s feet. The slide/barrel of the handgun is held against the back of the knuckles of the support hand. Care must be taken to ensure that the muzzle does not point outward to the front or to the side of the shooter. The muzzle MUST be straight down.
4. The strong hand thumb is extended towards the support hand thumb so that both thumb tips are touching.
5. Elbows should be relaxed against the shooter’s sides.
6. Should a threat requiring the use of the handgun appear, simply push the handgun out away from the body allowing the hands to pivot at the thumbs as the two hands come together in a firing grip. Trigger finger is straight until the sights are on the target. With practice this becomes extremely smooth as we press the handgun towards the threat.
7. To return to Position Sul, pivot at the thumbs as the direction of motion is reversed.
8. When scanning 360° in Position Sul, it is inevitable that the weapon’s muzzle will point at the shooter’s feet if the feet remain stationary. To keep this from occurring, it is necessary for the shooter to step while turning, rather than simply turning at the torso.
Below is a phot of Position Sul:

You can see how this would be a very safe ready position when in stack or operating in a chaotic area with friendlies in multiple positions around you.
I highly recommend incorporating drills into your practice routines that have you shooting from a Sul starting position. If you're focusing on CQB exercises, you may want to especially focus on shooting from the High Ready position as demonstrated in the first photo below or the CQB, or Wing Guard, position as demonstrated in the second photo below.

It's called Position Sul and, IMO, is an excellent tactic to learn and practice for close-quarters work.
According to Max Joseph & Alan Brosnan, the alleged inventors of Position Sul, it is the one ready position that ensures team safety & handgun retention, even in CQB. The name Sul is taken from the Portuguese language. It simply means “south” since that’s where the muzzle is directed in this position.
Alan Brosnan describes the genesis of this position this way:
Position SUL, is not a classic "gun ready" position, but rather a "gun safety" position. It was primarily designed for the Brazilian officers as they poured out of their SUVs on missions in the slums. Their muzzle control was atrocious, and since Max and I were in the SUVs, it did not take much brain power for us to create a solution to this evident problem -- be it right or wrong for many of the US instructors and critics. I think most of them thought it was a substitute for a classic "gun-ready" position and that is where the confusion came in. The position has taken off among the law enforcement and military training community. After they understand the concept, it's hard for them to disagree with it, especially since it affects safety - predominately their own!
Here's a description of Position Sul from another website:
1. The support hand palm should be flat against the solar plexus, with fingers extended and parallel to the ground. The support hand thumb is pointed towards the shooter’s chin. (Elevation of the support hand may vary but most shooters find that they are able to maintain correct hand position without undo stress on the wrists when the hand is held about naval level.)
2. The strong hand maintains the grip on the handgun. You must also keep the trigger finger off the trigger and on the slide or frame.
3. The muzzle of the weapon is pointed directly at the ground between the shooter’s feet. The slide/barrel of the handgun is held against the back of the knuckles of the support hand. Care must be taken to ensure that the muzzle does not point outward to the front or to the side of the shooter. The muzzle MUST be straight down.
4. The strong hand thumb is extended towards the support hand thumb so that both thumb tips are touching.
5. Elbows should be relaxed against the shooter’s sides.
6. Should a threat requiring the use of the handgun appear, simply push the handgun out away from the body allowing the hands to pivot at the thumbs as the two hands come together in a firing grip. Trigger finger is straight until the sights are on the target. With practice this becomes extremely smooth as we press the handgun towards the threat.
7. To return to Position Sul, pivot at the thumbs as the direction of motion is reversed.
8. When scanning 360° in Position Sul, it is inevitable that the weapon’s muzzle will point at the shooter’s feet if the feet remain stationary. To keep this from occurring, it is necessary for the shooter to step while turning, rather than simply turning at the torso.
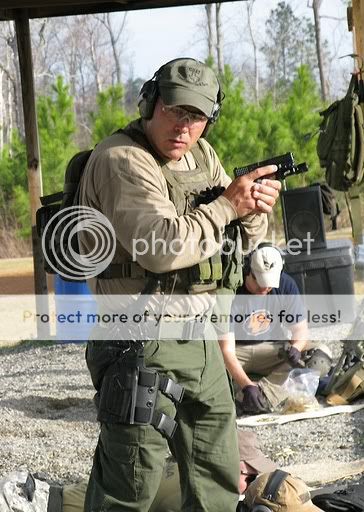
Below is a phot of Position Sul:
You can see how this would be a very safe ready position when in stack or operating in a chaotic area with friendlies in multiple positions around you.
I highly recommend incorporating drills into your practice routines that have you shooting from a Sul starting position. If you're focusing on CQB exercises, you may want to especially focus on shooting from the High Ready position as demonstrated in the first photo below or the CQB, or Wing Guard, position as demonstrated in the second photo below.