• Mossberg Owners is in the process of upgrading the software. Please bear with us while we transition to the new look and new upgraded software.

Stories that my Mom used to tell me -update pg 4 and 5

Thanks Caddman.

I like to use the lathe to single point cut the threads whenever possible. It is a lot more precise than I could ever accomplish doing it all by hand with a die wrench. And for a project like this, you want as much precision fitting as humanly possible.

I won't pretend that my tool or handiwork is as accurate as a CNC machine, but I can guarantee that it's better than anyone could do by hand. And with as close tolerances as I'll need for it in the end, I want the best I can do.

The bed on my lathe is dated 1986. It was barely used at all when I bought it from my friend. It was his late Fathers. He probably hadn't used it maybe 3 times. His cutter bits didn't even hardly show any wear at all on them.

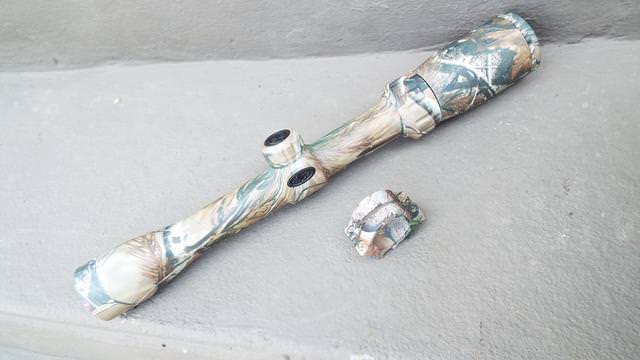
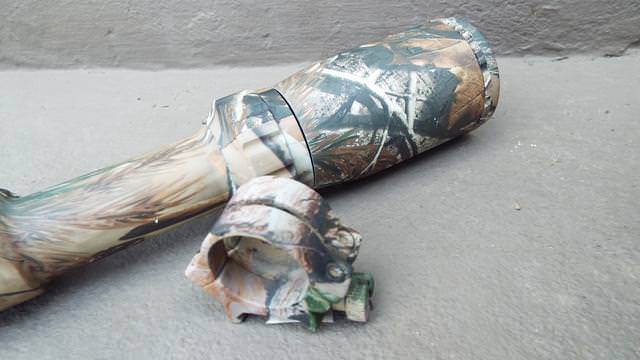
I was able to score a Bushnell Sportsman 1.5-4.5 optic with a circle x reticle that I like on ebay for $40 shipped. I couldn't pass it up. For the way that I use the gun and how I hunt, the low power optics work the best for me.

The scope was already camo'd in Realtree AP, and while that is slightly different pattern than what I have on the receiver, and even a slightly different pattern than what is on the stock too, it all will blend together well.

The main difference in the scope pattern, it has some "pine tree needles" artwork, while my other patterns do not have pine needles. And ironically and probably luckily for me, the rings will cover the majority of the pine needle artwork and it still has some green leaves.

Here's the scope as I took it out of the box, along with a ring that I camo dipped this morning with the realtree pattern I had. The other ring was still a little tacky and why it wasn't in the picture but it is essentially the same as this one.

Lq4NthB.jpg


pncF8Vr.jpg
 
I would second the FVSR its one of my most fav clean and accurate.
If I may id also submit the Steyr Scout, it has earned the name McDreamy after a brain surgeon on the wife favorite tv show. Ive owned a year now and its a goto rifle for me sporting night vision, soon to also be threaded. Straight pull is sweetness is all I can say. Stock is ultra comfy. And Mcdreamy is a proven killer in the field. So for something ya wont see on every firing line the Steyr is nice. View attachment 18678 View attachment 18679

As nice as that is, (and I do own an FVSR which is not nearly as nice as yours) I am even more in love with the curio cabinet and Chippendale chairs. They can't be real, right?

All my antique furniture is fake except a few small bits, but 40 years ago I lived in a fully furnished 1920's craftsman house built by a rich guy, and the chippendales were real. OMG they put my modern fakes to shame. ;(
The bedroom was Grand Rapids with 4' round vanity mirror. Wish I had bought it all (except that my ex woulda got it.)
 
Last edited:
Well that sounds like you got a very nice lathe John. Color me jealous.

The last thing I made on a screw cutting lathe was a stick shifter for my 66 Ford.

I couldn't afford a Hurst, and I had already managed to break an Indy and a Spark-o-matic. Mine was Rock Solid, if not Chrome plated.

Unfortunately it occasionally found a false neutral, with the transmission in 2nd and the poor dummy I sold the car to couldn't figure it out & drove it across Nevada in second gear. In July.

RIP my highschool Ford....
 
As nice as that is, (and I do own an FVSR which is not nearly as nice as yours) I am even more in love with the curio cabinet and Chippendale chairs. They can't be real, right?

All my antique furniture is fake except a few small bits, but 40 years ago I lived in a fully furnished 1920's craftsman house built by a rich guy, and the chippendales were real. OMG they put my modern fakes to shame. ;(
The bedroom was Grand Rapids with 4' round vanity mirror. Wish I had bought it all (except that my ex woulda got it.)

Yes Real, c.1920s. Walnut and mohair acquired while in Italy years back.
 
Well that sounds like you got a very nice lathe John. Color me jealous.

The last thing I made on a screw cutting lathe was a stick shifter for my 66 Ford.

I couldn't afford a Hurst, and I had already managed to break an Indy and a Spark-o-matic. Mine was Rock Solid, if not Chrome plated.

Unfortunately it occasionally found a false neutral, with the transmission in 2nd and the poor dummy I sold the car to couldn't figure it out & drove it across Nevada in second gear. In July.

RIP my highschool Ford....
 
After doing some thinking, I believe that I am going to make a thin clamshell sleeve to go between the monocore baffle stack and the suppressor tube.

This should make it easier for me to get everything apart to clean.

But will be more time consuming to machine everything. Especially the thin clam shell. That's going to be the most difficult and time consuming thing because thin tube is a pain to turn down. Though once it's done, it's done. A half an hour of standing over the lathe versus a lifetime of taking it apart and cleaning it every so often. Yeah, it'll be worth a few extra minutes of my time.

I'm going to use the thinnest aluminum wall that I can get and turn down the outside diameter so it will fit into the suppressor tube better.

.093" actually. It will have no structural purpose, other than to serve as a thin cover over the baffles so the lead deposits onto it rather than the suppressor sleeve so I can simply slide the suppressor tube off easier, and then separate the clamshell halves to access the baffles for cleaning.

Should add virtually no weight (maybe a 1/4 oz if that).

OK, now for the million dollar question.

Should I use 7075 aluminum or 4140 Chromemoly for the monocore baffle?

Either will be strong enough to work with 22, but the Aluminum being softer, will degrade faster between the two. And would also limit what chemicals I use to clean with. I'm not really keen on using "the dip" because of the toxicity, but I don't want to paint myself into a corner either to where I couldn't use it if I had to.

I expect the aluminum baffle would weigh around 3.5 or 4 oz while the steel will easily top off at least 10 oz.

10 oz sounds like a lot, and it is I guess if comparing apples, but 12 oz of weight already came off the gun from turning down the barrel and shortening it. So, in the grand scheme of things, shouldn't make it burdensome.

So, what material do you guys think I should use? I'm leaning toward the steel, just for taking into consideration the increased life span of the material.

It's going on a bolt gun, so heat isn't a concern. Just easier cleaning and stronger material.
 
My knowledge of metals would fit into a thimble. It seems to me though that you answered your own question. The steel will last longer and be easier to clean.
 
When heated, Aluminum expands approx 3x faster and 3x as much as steel.

Very hard to work if using tempered hard alloy, but probably worth tempering afterward if you don't get too much distortion.

A thin cylinder wants to expand on its circumference a lot whereas a thick cylinder wants to expand a little more on it's length.

You want to put it together so it doesn't rattle, but if the aluminum compresses when hot, it could crush slightly and make it rattle anyway.

If you machine the aluminum parts and then boil the raw aluminum in hot water for a while it's seals up the pores and makes the surface denser, kind of like case hardening.

I know that with a battery charger and a plastic bucket you could do some hard anodizing of these parts as well, but I don't know the exact formulas.

As I recall it didn't involve much more than caustic soda and water (and first a solvent wash for degreasing)

I would say use stainless steel for durability but I think the aluminum will ring less & make a duller sound.
 
Yeah, I am kinda leaning toward steel. Teeter tottering back and forth actually. Would 7075 work for the next lifetime or two? Possibly outlast the barrel?

Yeah, it probably would. Would be lighter too.

My OCD says build it to last as long as possible though. Tax stamp process takes too long, too costly and is only a 1 shot deal.

If this were Europe or Brittain to where I could make cans so they would last a few years and rebuild them as needed, it wouldn't even be a consideration.

But it's not that way here unfortunately. Land of the free is too heavily regulated. :(
 
I think the key to using 70-75 is to temper the parts and then hard-anodize them. As they are tiny, it won't take much of an oven to do this and it's a fairly simple process.

Might have to try it a couple times to get it just right though . . .
 
Just a little more about anodizing aluminum...

It's a fairly simple process, but the key is the amount of voltage to use and the amount of time you leave it in the solution.

For such tiny parts those may have to be tried and tested.

Finally, a cryogenic pre-tempering or post-tempering could be the key to longevity of these parts. I knew a guy who was doing cryogenic tempering (or perhaps it is really cryogenic annealing?) of parts for Bonneville speed record cars.

They recorded a good degree of toughness increase in metal that would normally be less so.
 
[QUOTE="CaddmannQ",
A thin cylinder wants to expand on its circumference a lot whereas a thick cylinder wants to expand a little more on it's length.

Thanks for the reference.

The clamshell only serves as a shield between the baffles and the outer tube. After shooting suppressed 22's for a while, I know they tend to ionize the hot lead from heat/friction and it tends to leave heavy deposits along all the contact surfaces. So, the clamshell would only be a barrier so the outer tube/suppressor body will slide off easier and with less risk of damaging anything taking it apart and putting it together. I had also considered adding a single pin in the front and the back of the halves to prevent them from moving much. And also I suppose as an indicator mark where to drop them in place.

I didn't mean that I would pin the clamshell in place, just have the pins and holes so they seat where they need to and pretty much stay there until you take the covers off.

You are correct about rattling around. It would need to be pretty precise in both the interior diameter that I turn the baffle stack down to, and the OD of the clamshell so the outer tube will slide over it. That is something I have thought about.

If I notice that it is making noise, I thought that I could apply a thin coat of paint on either inner and/or outer diameter to take up a few thousanths of space. If it's really bad, maybe rub a thin layer of epoxy over or under the clamshell to take up some space or deaden the blow a little and sand as necessary.

Over time though, the fouling and likely a little blow by between the contact surfaces of the inside diameter, may be enough to fill in any slight gaps with some use.

My lathe is pretty precise, but when you're down talking hundreths of inches, and then removing some of that OD on a long tube, I can't guarantee that I can hold it to those tight of tolerances that well.

Matter of fact, it's about a given that I can't.

You are very correct though. If the tolerances get too high, it would create some sound or rattle.


If you machine the aluminum parts and then boil the raw aluminum in hot water for a while it's seals up the pores and makes the surface denser, kind of like case hardening.

I know that with a battery charger and a plastic bucket you could do some hard anodizing of these parts as well, but I don't know the exact formulas.

I've thought about anodizing the baffles and I suppose the clamshell too. Though I don't pretend to know whether it will help anything in relation to strength (for what little I need it to do) or cleaning. If you notice, even on most commercial suppressors, they're raw aluminum. With few exceptions.

Though it wouldn't really hurt to anodize the parts.

The baffle would only be 6.5 inches long. I'm sure I could find a tall glass jar that would work to do any sort of DC electro-stuff.
 
What they taught us as Engineers is that when you boil the raw aluminum the pores in the aluminum close up because they kind of self anodize.

Anyhow this makes the surface surface denser.

It also helps reduce corrosion because aluminum corrosion typically starts in the pores.

When they make Billet aluminum it is like a sponge on the microscopic level. There are tiny bubbles, maybe half a thousandth dia. . . . I forget. I haven't done that work since the mid 80s.

When you cut the aluminum and create a raw surface it is always interrupted by cut bubbles which are the pores of the aluminum surface.

So anyhow if you do nothing else I would boil the aluminum parts in water and then polish them up a little bit and let it go. Unless you set up to do military hard coat Anodizing there's probably no point in bothering with anything more than boiling.

You're not just cooking the metal you see. When you boil water the oxygen and hydrogen ions dissociate and it's like electrolysis is happening right there in the pot.

But I think the actual electrolysis only occurs in the pores because of something called the Hall effect.

On an electrically charged surface the charges will tend to run to the edges and corners of the surface, as like charges on the surface literally flee from each other (just as do likely charged magnets.)

So anyhow the electrical charges wind up right on the edge of those pores but they don't go in. Instead, you have localized regions of cathodic and anodic action in close proximity, and it causes the pores to shrink, to fill up with hard aluminum oxide, and to basically disappear.

But this cannot happen inside the metal of course. Only where you have pores on an exposed surface.

Anodizing is just a controlled oxidation process that produces a nice hard finish. In its simplest form it is clear anodizing and you see the aluminum as if it was raw and silvery.

In its most common architectural use the aluminum is allowed to anodize until it achieves a dark bronze color.

This is how military hardcoat is done but there are some additional chemicals I don't know about. I have actually seen aircraft nose cones being anodized in the 70s, but I never determined the exact process.
 
Really good info. Thanks for sharing that with me.
 
After several days of trying to think this through, I think I'm going to do the core with Aluminum rather than steel.

While I'm OK with doing everything overkill (steel), I just think Aluminum will be more appropriate for a bolt action core. Heat isn't going to be as much of a concern as if it were being used in a FA or even semiauto. And with the ROF being a lot less in a bolt action, won't be seeing near the amount of rounds going through it as a semi or FA would. You can easily go through a whole box of ammo in a couple of magazines in a semi in a matter of 2 minutes, while it might take 15 minutes to go through the same size box of bullets with a bolt action.

So, a steel core just doesn't seem "necessary" for this particular project. I would gain some physical strength and weight, but strength wasn't really one of my concerns over 7075, which has a decent amount of strength for an Aluminum grade.

Going back to the clamshell and holding tolerances on the OD of the thin piece, the lathe kept it better than I expected. Turning that thin tube was difficult, even with a very slow feed rate.

I'll still need to cut it to length (being so thin I'll probably just use a pipe cutter for that step), and I will also need to cut it lengthwise, but that won't come until much later. Matter of fact, that will probably be the last step. I'm just happy that I was able to turn the OD down as close as I needed to. But for the time being, it's still the same thing as it started out being. Just a long piece of thin tube.
 
With the stock being a big complaining point to some that believe that it flexes too much, this one won't.

I'm using a 1/4" 6061 aluminum rod and embedded it into the stock.

First off, I drilled a hole into the front cavity of the stock so I can push the rod into it about an 1/8 of an inch. Sorry for the blurry picture. I didn't realize it until I uploaded it. You should still be able to make out the hole up front of the stock. Obviously the hole doesn't protrude all the way through, but it is about half way through. That gives it something to seat into properly.

brer rabbit stock 004.JPG

Then, I used the dremel to grind through the small reinforcing ribs so the reinforcing rod will fit without having clearance issues.

h8NEYKT.jpg


ovqAG0K.jpg


And checking clearances before adding epoxy, I used the scrap piece of aluminum tube approximately the same diameter as what the suppressor tube will be to make sure no part of the two came into direct contact with each other (the point of freefloating a stock). Might not look like it, but there's probably at least a 1/16 of an inch gap between the two. That's more than enough.

I don't think anyone will be able to ever complain that this set up is going to "too weak and flimsy".

While I don't pretend to think it's going to be any more accurate than it ever was, free floating the barrel and adding lightweight rods through the stock isn't going to hurt it any.

Y1OiKOJ.jpg
 
So how thin did the clamshell tube turn out to be?

Good luck with the forestock modifications. I was going to attempt something similar on my Savage
.22 target rifle, and on the Marlin Model 60. No telling when I'll be able to get to that.
 
The clamshell will be very thin.

.992" OD and .925" ID

I can't really make it into anything yet. It's just a piece of very thin wall tubing at this point. I will still have to cut to length of whatever I'll need and will have to slit it up both sides to halve it. That won't be until later though.

I do believe that it will work out very well though.
 
That sounds like pretty slow work to turn it that thin without distortion.
 
Probably about 20 minutes for ~ 6 inches. As I said, it was a very low speed rate.

When I was turning the piece down, I started out with a fairly decent feedrate (or so I thought). It looked about like an ocean wave the farther I went.

So, I flipped the piece of tube around in the lathe and slowed the feed rate down to almost nothing. You can check and it'll be anywhere between .989 to .992" wherever you put the caliper at.

That's as well as I can do. It's not perfect, but I was rather amazed that my machine could keep it within that little tolerance wherever you check. I was expecting it to be much worse.

fIPcXUD.jpg
 
Back
Top