blacksmith
.270 WIN
The Mossberg elevator is a unique design. The skeleton elevator, also known as a carrier, folds flat against the bolt and locking block. This eliminates the dreaded "flap" found on other shotguns.
Unfortunately this elevator was designed for mass production and not high performance. We have read too many complaints from our members about this part. After some R&D work we found a solution. This how-to article will show you how to make your own Improved Mossberg Elevator.
The stamped steel piece has two major issues.
#1. Rough / Bumpy surface when loading.
#2. Jam when manually unloading shotgun.
To fix these problems you'll need to remove the elevator and have a metal file handy. When done correctly these modifications cannot and will not affect the robust reliability of these shotguns. This is achieved since we are only working on the bottom of the elevator and we have plenty of material to work with. When finished the loading & unloading of your shotgun will have improved dramatically.
Go slow and install at intervals for test fit. We can always remove material, but cannot add anymore!
Step #1. Bevel the bottom of the finger. It is a sharp 90 degree angle. Your job is to eliminate this nasty angle.
Step #2. Bevel the bottom of the bump. Only the bump is necessary. Stop filing before you get into the top side.
Step #3. Lay file flat across finger and bump. File both the finger and the bump simultaneously.
Optional:
Step #4. Polish filed areas. Unnecessary but every little bit helps.
Step #5. Use touch-up blueing on filed areas (matte parkerized only).
Step #6. The locking block is a large, heavy piece of rough cast steel. It is very strong and very rough. The rim of the shell rides down the valley of the locking block when loading. File / Polish the 90 degree angle where the shell contacts the block.

[url=https://flic.kr/p/pqvGbh]
[url=https://flic.kr/p/pqxc6c]
[url=https://flic.kr/p/pqxc48]
[url=https://flic.kr/p/p93WvA]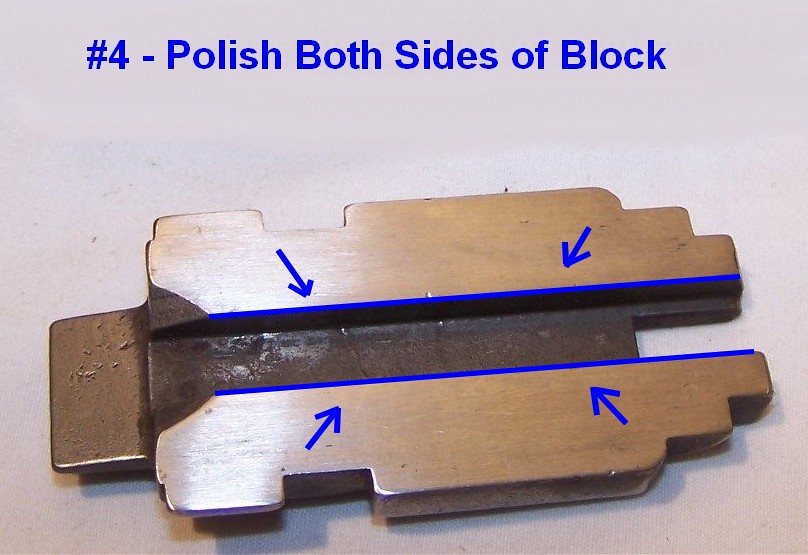 [/url][/url][/url][/url]
Unfortunately this elevator was designed for mass production and not high performance. We have read too many complaints from our members about this part. After some R&D work we found a solution. This how-to article will show you how to make your own Improved Mossberg Elevator.
The stamped steel piece has two major issues.
#1. Rough / Bumpy surface when loading.
#2. Jam when manually unloading shotgun.
To fix these problems you'll need to remove the elevator and have a metal file handy. When done correctly these modifications cannot and will not affect the robust reliability of these shotguns. This is achieved since we are only working on the bottom of the elevator and we have plenty of material to work with. When finished the loading & unloading of your shotgun will have improved dramatically.
Go slow and install at intervals for test fit. We can always remove material, but cannot add anymore!
Step #1. Bevel the bottom of the finger. It is a sharp 90 degree angle. Your job is to eliminate this nasty angle.
Step #2. Bevel the bottom of the bump. Only the bump is necessary. Stop filing before you get into the top side.
Step #3. Lay file flat across finger and bump. File both the finger and the bump simultaneously.
Optional:
Step #4. Polish filed areas. Unnecessary but every little bit helps.
Step #5. Use touch-up blueing on filed areas (matte parkerized only).
Step #6. The locking block is a large, heavy piece of rough cast steel. It is very strong and very rough. The rim of the shell rides down the valley of the locking block when loading. File / Polish the 90 degree angle where the shell contacts the block.
[url=https://flic.kr/p/pqvGbh]
[url=https://flic.kr/p/pqxc6c]
[url=https://flic.kr/p/pqxc48]
[url=https://flic.kr/p/p93WvA]
[/url][/url][/url][/url] But I'm not complaining because I love to work on my firearms and this is just one more modification that will assure me whatever the original "problem" was, it won't be one in the future.
