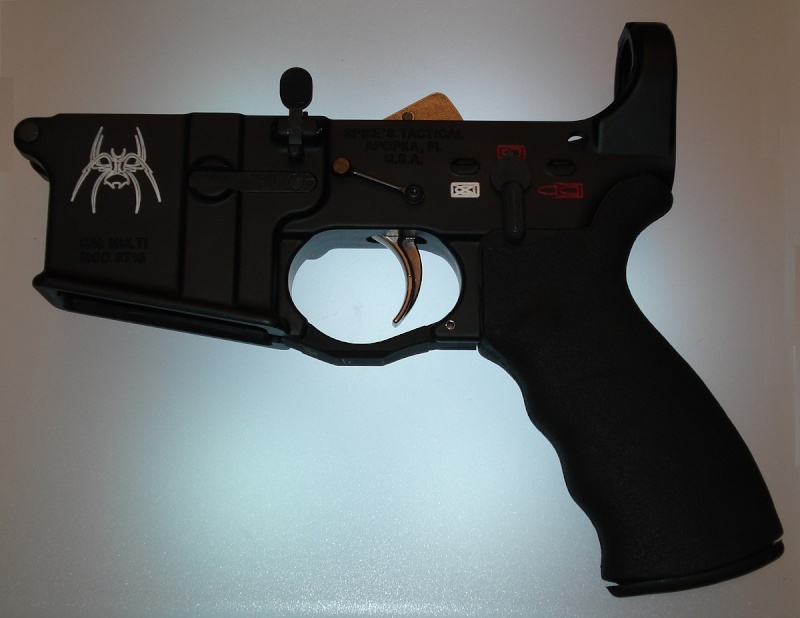
• Mossberg Owners is in the process of upgrading the software. Please bear with us while we transition to the new look and new upgraded software.

New AR Project...

Re: My New AR...

TRIGGER ASSEMBLY


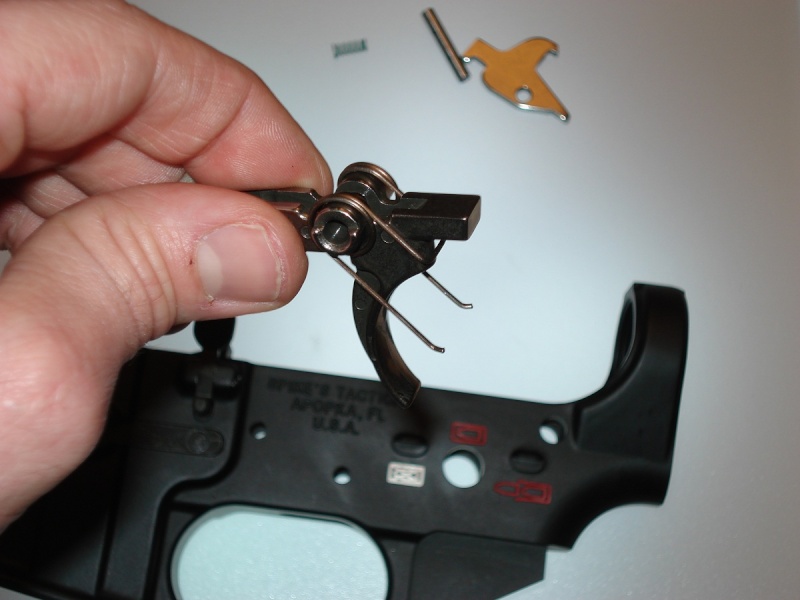
PARTS: Trigger, Trigger Pin, Trigger Spring, Disconnector, Disconnector Spring
TOOLS: 5/32" drive pin punch


•Shoulder trigger spring onto trigger with ends of spring forward and under.

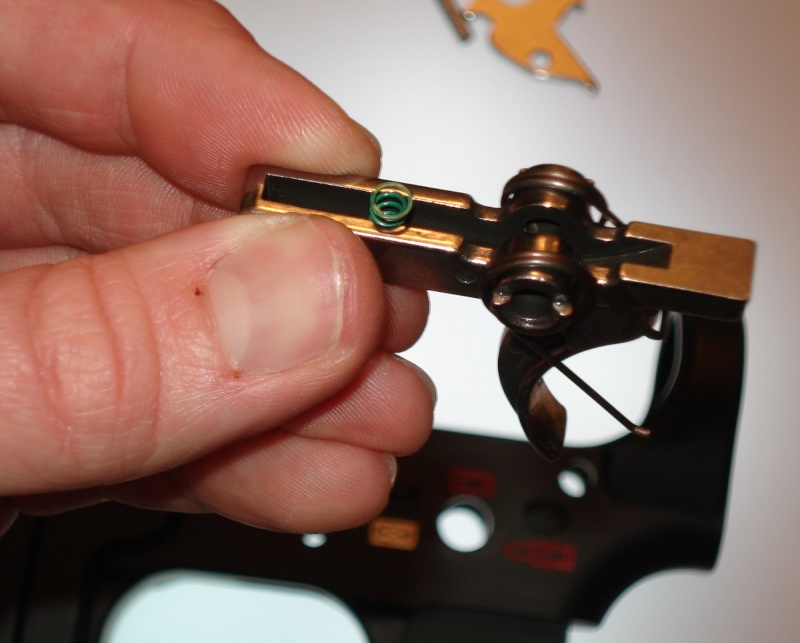
•Install disconnector spring with the wider portion of spring down towards trigger and push until it locks in there.

•Position disconnector on top of trigger, where trigger pin will hold both in place.

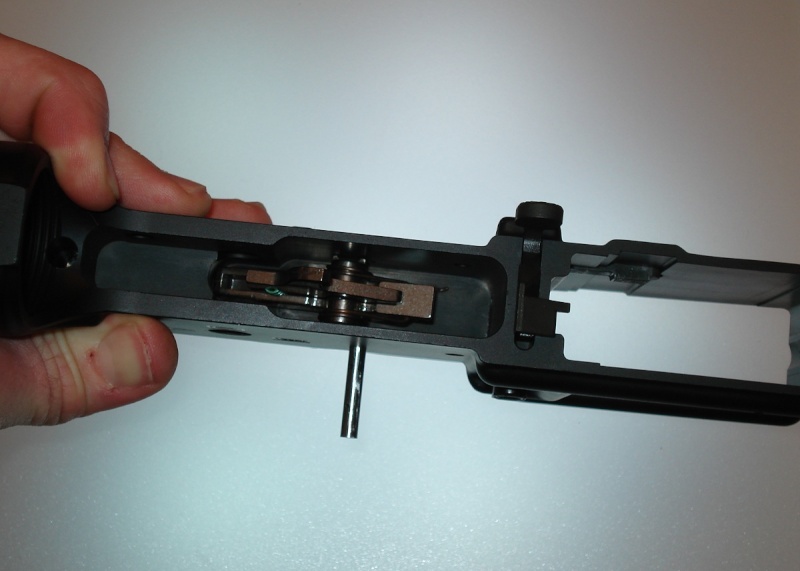
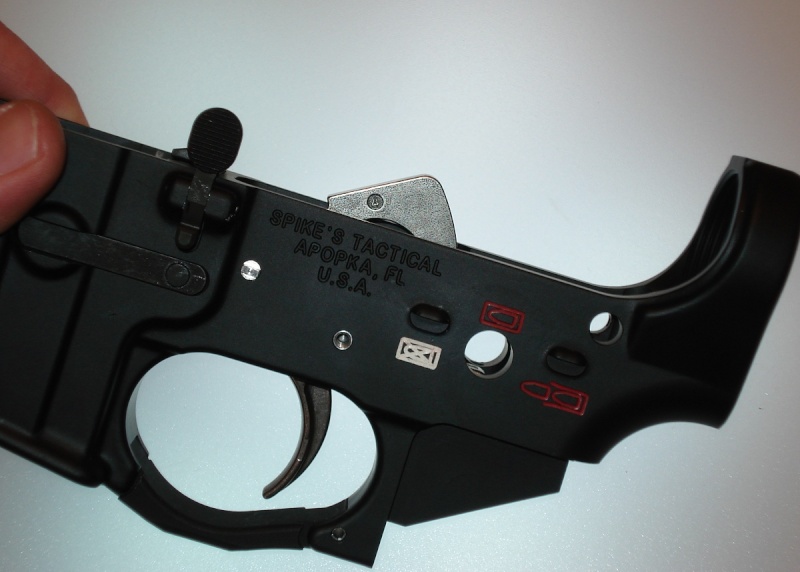
•Insert trigger assembly into receiver.

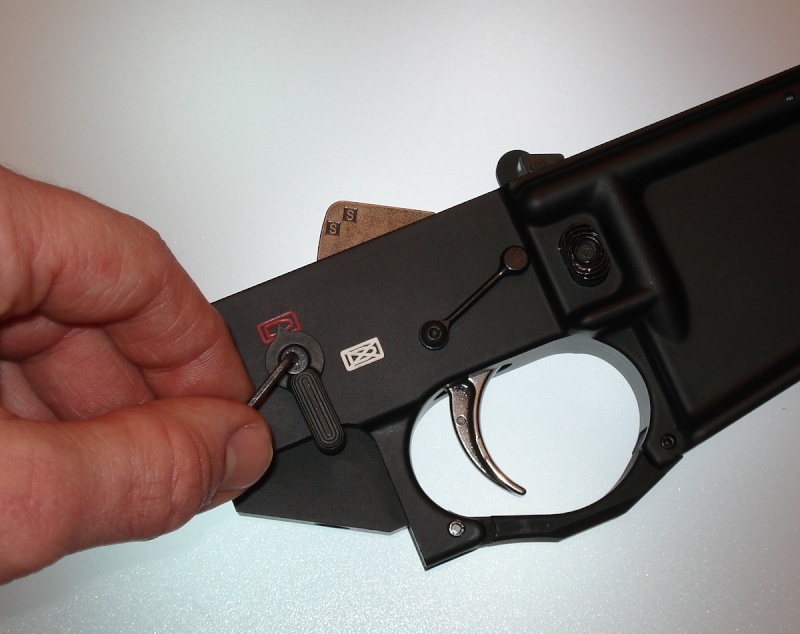
•Insert trigger retaining pin through receiver, trigger, and disconnector. The trigger pin has 2 grooves in it; one in the middle of the pin and one off to one side. It does not matter which way it is inserted, though common practice is to insert from left to right, with the groove to the left.

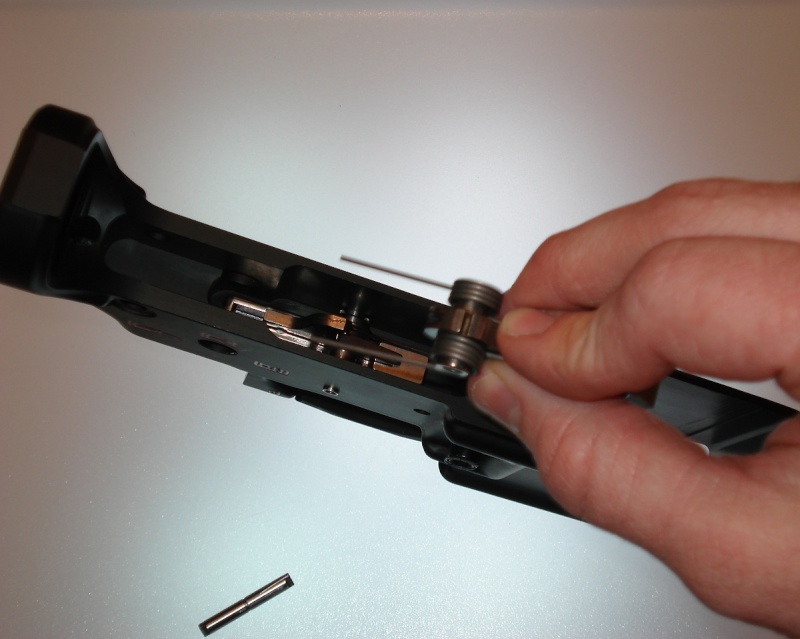
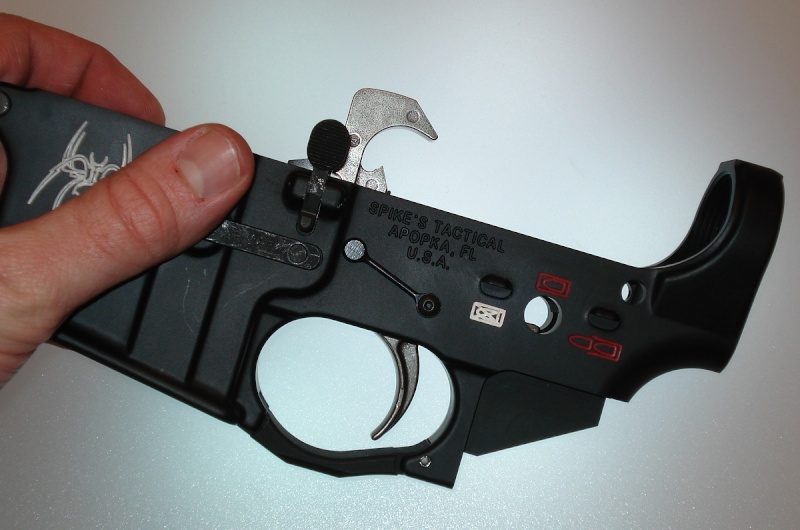
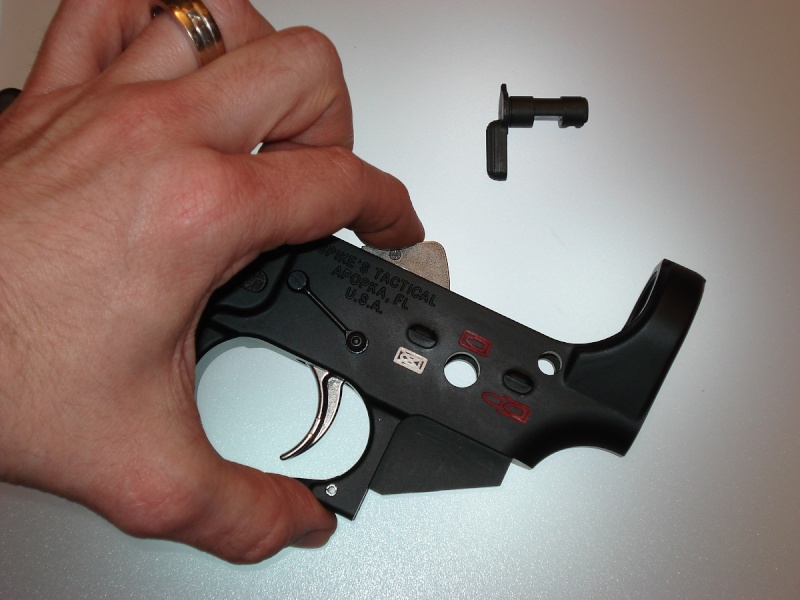
•Insert hammer pin from opposite side to help align things as you push the trigger pin in and the hammer pin out. You will have to push down on trigger assembly to align the holes and get the pin in all the way.


FUNCTION CHECK

•Make sure that the trigger pivots smoothly when depressed.

•Verify that the disconnector pivots when pushed.


Re: My New AR...

Wow, Nice Work! And detailed pics, well done!!!
 
Re: My New AR...

HAMMER ASSEMBLY

PARTS: hammer (with J-pin installed), hammer spring, hammer retaining pin
TOOLS: 5/32" drive pin punch


•Install spring onto hammer, ends of spring to rear and shoulder on back of hammer.

•Install hammer in receiver with feet pointing rearward away from hammer

•Use 5/32" punch to retain hammer in place as you insert hammer retaining pin.

•Like the trigger pin, you may have to push down and align the holes perfectly in order to push the pin in all the way.

•Ends of the hammer spring will rest on top of the trigger pin, with one end in the groove on the trigger pin.

•Inserting the hammer pin may require some effort, as the J-pin in the hammer will catch the grooves in the pin.


FUNCTION CHECK

•Verify that hammer locks to the rear when pushed back.

•Verify that hammer pivots forward when trigger is pressed.

•Without releasing the trigger, push the hammer back again and verify that it locks (caught by disconnector).

•Releasing the trigger should not cause the hammer to pivot fully forward (caught by trigger).

•Hammer will fall when trigger is pressed.


My kit came with anti-roll pins, so I added those...


Re: My New AR...

SELECTOR ASSEMBLY


PARTS: safety selector
TOOLS:

•With hammer cocked back, insert from left side of receiver, selector pointing up in the 'fire' position.
FUNCTION CHECK

•Make sure selector rotates freely.


Re: My New AR...

PISTOL GRIP ASSEMBLY


PARTS: selector detent, selector detent spring, pistol grip, pistol grip screw, lock washer
TOOLS: Allen key or flat-blade screwdriver (depends on your screw type)


•Install detent, pointed end towards the selector, and the spring into the receiver from the bottom.

•Carefully compress the spring with the grip and make sure spring fits into hole in grip.

•Check the function of the selector with the grip held in place; if too tight (unable to rotate) you may need to either cut the spring, or clean out the hole in the grip.

•Once feel is acceptable, secure the grip in place with the screw and lock washer.


FUNCTION CHECK

•Verify selector is able to move from safe to fire and clicks in place. It should not move past the 'safe' or 'fire' positions.

•With selector on 'safe', verify cocked hammer is not released when trigger is pressed.

•With selector on 'semi', verify hammer is released when trigger is pressed.
NOTE: Selector cannot be rotated to 'safe' unless hammer is cocked.


Re: My New AR...

... and here is the completed lower minus the buffer tube assembly...


The leftover parts below will be used during installation of the buffer tube assembly when it arrives on Tuesday...


Stay tuned for more...
 
Re: My New AR... (build updated)

Awesome detailed job there LAZY!!

That is gonna be one sweet AR when your done. What are plans on the upper??
 
Re: My New AR... (build updated)

Nice work :cool:
I just finished building two AR's in the last month.
What are your plans?
 
Re: My New AR... (build updated)

Thanks fellas!

Still looking at uppers and narrowing them down, but it'll be a standard carbine length M4-A2 configuration. Found a great deal locally on a new complete Bushmaster upper, but gonna look a bit more first.
 
Re: My New AR... (build updated)

I've narrowed my search to two 5.56 uppers.


First there's the relatively basic Bushmaster 16" standard carbine length M4 A2...


It's local, cheap, and readily available so I can pick it up whenever I'm ready. My 24" target AR is a Bushmaster that's been flawless so I don't have any issues with the brand. I know there's a lot of folks out there that love to hate em though.


Second, there's the Spike's Tactical 16" M4 LE Upper w/7" BAR Rail


FEATURES:

•16" Spike's Tactical, 1:7 Twist, Mil-spec Grade Chromoly Vanadium Barrel
•Extended M4 Feedramps
•Mil-spec Hard Chrome 5.56 NATO Chamber & Bore
•1/2x28 Muzzle Threading
•M4 Barrel Profile, Carbine Gas System
•Barrel is HP Tested & MP Inspected
•F-marked A2 Front Sight Base, .750" Diameter Gas Seat
•Spike's Tactical Mil-spec M16 Bolt Carrier Group
•Bolt is shot peened, HP Tested, & MP Inspected
•Forged Mil-spec Charging Handle
•Laser Engraved T-Markings
•Mil-spec Dry film Lube inside Upper Receiver
•Spike's Tactical 7" BAR Rail
•A2 Flash Hider
•ST-T2 Tungsten Buffer


I'm REALLY diggin the Spike's upper! It's only $150 more than the Bushy, but the catch is there's a 6-8 week wait time for the build. I'm really not looking forward to that kind of wait, but I may just have to suck it up and be patient. It's a LOT more upper for a few extra dollars.
 
Re: My New AR... (build updated)

Ok, take this or what its worth, which is nearly nothing cuz I've never built one.

My preference is for more of the MRP style, so I say the Spikes. I'd do away with the font sight though and do the flip up and set up a co-witness that way. But again, I've never done it. Thats just the way I would like to do one! :D
 
Re: My New AR... (build updated)

I hear ya Brad. I'm really leanin the same direction, it's just the wait time that's killin me.

As far as sights/optics goes I'm leanin toward a bare bones set-up for this one with fixed front and rear sights. I've always been so reliant on optics I'm looking forward to using some irons for a change.

On the other hand, Dave's got me wantn one of those Trijicon setups pretty bad! :p
 
Re: My New AR... (build updated)

Nothin wrong with irons either!

Yeah I dig the Trijicon too, but irons on an MRP is still a really nice look!
 
Re: My New AR... (build updated)

Lazy Eye,

thanks for keeping this thread updated, and posting the pictures. If it were my choice, I would go with the Spikes Tactical upper.


LAZY EYED SNIPER said:
On the other hand, Dave's got me wantn one of those Trijicon setups pretty bad! :p

Any time I think about getting an ACOG, all I have to do is look at the price. That brings me back to reality. Don't get me wrong - the ACOG is a great optic, but the price is a little (OK, a lot) steep for me right now.
 
Re: My New AR... (build updated)

Sorry I have you lookin at the Trijicons, LAZY but I will tell you, mounting the first one on my ACR brought a whole new experience to my aging eyes!!! Even though I put the Trijicons on my ACR and SCAR they both have flip up battle irons on' em still.

The price, yes they are WAY steep and should be more affordable. I looked through a few others while picking up the Trijicon and the glass on these is remarkable. I traded a few rifles and scopes in on them to cover cost and beat' em down on the price a bit so in the end I'm very happy with both of these rifles setup with Trijicons on them. On Saturday a bunch of guys from the gun shop met at the range and I let them try out the SCAR which I had already dialed in nicely @100 yards. Everyone that shot it loved it, wanted it and couldn't believe how accurate it was and they knew I only had it out twice with this being the second time.


I like the spikes tactical but also like Bushmaster so this really comes down to feel, want and look. You do have more rail on the Spikes minus the front sight, add a set of Troy battle sights and boom boom boom.. :)
 
Re: My New AR... (build updated)

:lol: I can't blame it ALL on you Dave! I've been eyeballin the Trijis for a while, but haven't taken the leap. I've peered through several ovem and absolutely understand why they're as pricey as they are.

As far as the uppers go, it's just a matter of the wait vs. the instant gratification. I really want the ST, but the BM is ready to rock. I think I've been stalling in hopes that somebody'll buy the Bushy and make my decision easier. I've been having the hardest time talking myself out of just buyin both of em....... and I still might!
 
Re: My New AR... (build updated)

My Spike's Buffer Tube Assembly came in this afternoon and I got it installed. My lower is now complete.


Here's the parts...


Re: My New AR... (build updated)

TELESCOPING STOCK ASSEMBLY

PARTS: takedown pin, takedown pin spring, takedown pin detent, telescoping stock, buffer extension, backplate, locking ring, retainer, retainer spring, buffer spring, buffer

TOOLS: Telescoping Stock Wrench

•Insert retainer spring and retainer into recess in lower.

•Install buffer tube, backplate, and locking ring onto receiver and depress retainer when necessary to get it to rest under the extension tube. Turn tube until it is about 1/4 turn past the correct location.


Re: My New AR... (build updated)

continued.......


•Install takedown pin with groove to the rear and install detent and spring from the rear of the receiver.

•Backplate will now hold spring in place when you turn the extension tube back 1/4 turn.

•Tighten locking ring using telestock wrench for a snug fit.

•With the hammer down, insert buffer spring and buffer into buffer tube until retainer snaps up to lock it in place.

•Function check takedown pin, stock, and buffer retainer.


Back
Top