You are using an out of date browser. It may not display this or other websites correctly.
You should upgrade or use an alternative browser.
You should upgrade or use an alternative browser.
Duracoat.
- Thread starter Rossignol
- Start date
Awesome work. I have been on the fence about doing mine OD and Black or Woodland Green and Black
I have almost bought this kit about 10 times....any exp with this kit ?
http://www.houtsenterprises.net/dur_shakenspray.html
I have almost bought this kit about 10 times....any exp with this kit ?
http://www.houtsenterprises.net/dur_shakenspray.html
I don't have any experience with the kits.
I always did my patterns freehanded on that Avery sticker printer paper and cut them out with a razor. Sure, it took a lot longer, but I didn't like being stuck with pre-fabbed patterns that I couldn't change the shape/size on what I was painting to fit the gun better.
And all my work is done with a regular airbrush so I don't know anything about the aeresol sprayer kit. Sorry.
Sn3aKyGuY
.30-06
If you're picky about quality, do not order the aerosol kit. If you just want to spray some color, go ahead. The issue is you can't regulate the air coming out of the can so you get thick/thin spots that don't coat evenly or you get speckles. They sell an airbrush kit, but if you want to do more than one gun down the road just invest in a decent metal airbrush. The one they sell has plastic internals and it starts sticking after a gun or two worth of work. Plus the air hose that comes with it is junk and leaks like a shiv. If you have an air compressor already you can get a good airbrush for $60 - $90. Look at a Paasche H series, that's what I use for all my DuraCoat work, as well as other stuff I do such as R/C cars, laptops, knives, etc etc.
As far as the air brush goes, the one I recommended is a single action, siphon fed airbrush. This means you have a jar (or small cup) that attaches to the bottom of the airbrush and when you push the button it blows air plus paint at the same time. If you want to do a lot of small, intricate detail work a double action, gravity fed airbrush would be a better bet. With this your paint is fed from the top letting you conserve a little more paint due to it not being stuck at the bottom of the jar where the straw can't pull it up. You're going to pay more, but with a double action pushing down on the button gives you air flow and pulling back (while pushing down) gives you paint. It's kind of tricky to learn, but lets you adjust how much air and paint you get where as the single action gives you your preset air pressure and you adjust your amount of paint by turning a set screw.
EDIT: Another thing I wanted to throw out there is with DuraCoat, as with any quality paint, prep is key. If you spend 5 minutes prepping you're going to get a 5 minute prep look. Your best bet is to have everything media blasted, but if you can't do it yourself and don't want to pay someone to do it, then 400-600 grit wet/dry sand paper or a medium roughness scotch pad to scuff everything up is your best bet. Just make sure that you degrease everything well and wear gloves once you are done degreasing so as not to contaminate the surface again. I think I may do a write up when I do my 500 with some pictures.
Awastatyme
.270 WIN
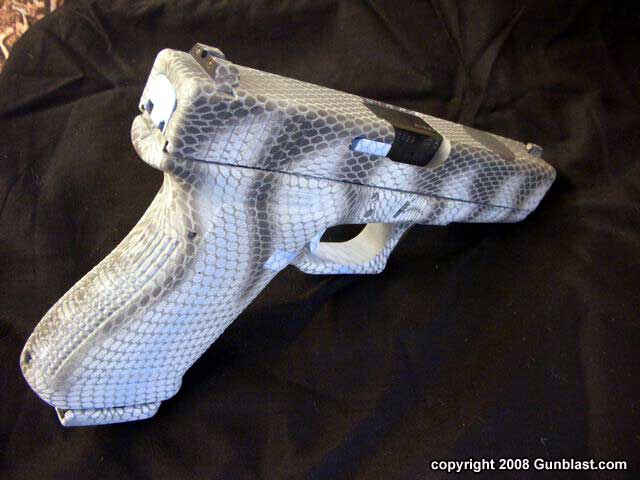
Here is a picture of what my buddie did to his Saiga 308. All done in duracoat.
John, that is a sweet looking snake skin job. Did you use stenciles or fishnet pantyhose?

John, that is a sweet looking snake skin job. Did you use stenciles or fishnet pantyhose?
Sn3aKyGuY said:If you're picky about quality, do not order the aerosol kit. If you just want to spray some color, go ahead. The issue is you can't regulate the air coming out of the can so you get thick/thin spots that don't coat evenly or you get speckles. They sell an airbrush kit, but if you want to do more than one gun down the road just invest in a decent metal airbrush. The one they sell has plastic internals and it starts sticking after a gun or two worth of work. Plus the air hose that comes with it is junk and leaks like a shiv. If you have an air compressor already you can get a good airbrush for $60 - $90. Look at a Paasche H series, that's what I use for all my DuraCoat work, as well as other stuff I do such as R/C cars, laptops, knives, etc etc.
As far as the air brush goes, the one I recommended is a single action, siphon fed airbrush. This means you have a jar (or small cup) that attaches to the bottom of the airbrush and when you push the button it blows air plus paint at the same time. If you want to do a lot of small, intricate detail work a double action, gravity fed airbrush would be a better bet. With this your paint is fed from the top letting you conserve a little more paint due to it not being stuck at the bottom of the jar where the straw can't pull it up. You're going to pay more, but with a double action pushing down on the button gives you air flow and pulling back (while pushing down) gives you paint. It's kind of tricky to learn, but lets you adjust how much air and paint you get where as the single action gives you your preset air pressure and you adjust your amount of paint by turning a set screw.
EDIT: Another thing I wanted to throw out there is with DuraCoat, as with any quality paint, prep is key. If you spend 5 minutes prepping you're going to get a 5 minute prep look. Your best bet is to have everything media blasted, but if you can't do it yourself and don't want to pay someone to do it, then 400-600 grit wet/dry sand paper or a medium roughness scotch pad to scuff everything up is your best bet. Just make sure that you degrease everything well and wear gloves once you are done degreasing so as not to contaminate the surface again. I think I may do a write up when I do my 500 with some pictures.
Thats a great nugget of info, +1 to ya
Sn3aKyGuY
.30-06
Yea, I think the issue is it just looks to uniform. Natural shapes are repetitive. I used to breed ball pythons before we had our first son and I just can't get down with that stencil as being scales. It just doesn't set right with me. I'm weird like that though, so take it with a grain of salt.
S
SHOOTER13
Guest
Lots of good info and pics John A. !! ...and thanks for the recipe ! ")
Sn3aKyGuY...I for one would like to see a detailed writeup on the process.
============================================
Reps for all involved with this recent exchange of ideas...!! Thanks guys
Sn3aKyGuY...I for one would like to see a detailed writeup on the process.
============================================
Reps for all involved with this recent exchange of ideas...!! Thanks guys
As I have said before, I do all my work freehand.
For my snakeskins, I used fishnet stockings AND handmade templates.
What causes the "scales" to look bigger is stretching the stocking too tight. That makes the appearance of the scales farther apart.


Same for camo's. All by hand


For my snakeskins, I used fishnet stockings AND handmade templates.
What causes the "scales" to look bigger is stretching the stocking too tight. That makes the appearance of the scales farther apart.
Same for camo's. All by hand
S
SHOOTER13
Guest
Some real nice camo paint jobs there John !!


Sn3aKyGuY said:If it's not a trade secret, how do you go about using the netting, John? I've heard of using clothes pins to hold it tight, applying spray adhesive, using thread to tighten it or using zip ties.
I'm not really able to do it anymore, so no trade secrets here.
On places that has a lot of bends, regular thread does the best at holding the netting close to the item to be painted.
Something like a set of grips, you could just put the item in the netting and let it lay there.
Sn3aKyGuY
.30-06
It sounds like you used to do a lot of what I'm getting into. Did you attend a gunsmithing school or are you of the self-taught class? I don't have a school around here that offers anything close to gunsmithing, but I'm a fairly smart guy and, without sounding to arrogant, most technical things come natural to me. I've been looking at expanding from just firearm finishing into some customization as well. American Gunsmithing Institute offers some good home based courses, but from watching the few that I've got my hands on through friends a lot of it seems like just learning how the various parts function and making them work the way you want.
No formal education for gunsmithing.
Like you, it's just natural to me.
I have always loved fooling with guns, and have been around them all my life. Shooting and hunting and collecting and building and changing and stuff. As time progressed, I got into collecting guns, then building guns and that led to getting my FFL's for almost a decade.
In that time, my hobby bloomed.
My Dad taught me a lot that I kept with me about wood (he was a master carpenter), which helps with traditional stuff, and I was always personally more interested in the metal.
I've also read into gunsmithing work, but a course or two from your local vocational/technical school will teach you just as much (or more). In particular lathe work and drilling/tapping/threading. Those are also good skills to have. Minor fabrication stuff. Brazing/welding
As I was growing up, I had a neighbor who painted cars (and whatever). From about 9 years old and up, I used to help him sand and mask, and prep after school and weekends and then as I got more into it, he taught me about pnuematic and gravity sprayers and let me mix the paint and clearcoat and finally I "graduated" into spraying myself.
Another neighbor I had built fiberglass boats from scratch. I helped him some too, but I was always more partial to being around Charlie.
All my days, I have been a hands-on kinda guy. And I guess has followed into my favorite hobby.